How To
Windows 10: How to find and set screensavers

- March 4, 2019
- Updated: July 2, 2025 at 5:16 AM
For anyone who owned or used a computer 5-10 years ago, you probably remember screensavers zipping across the screen after leaving your PC idle for a while: Colorful pipes zig-zag back and forth, bubbles lazily drifting across your desktop, or the Windows logo bouncing from border to border. Those of us who remember that last one are all too familiar with this struggle:
Screensavers used to be a means of protecting CRT monitors from burn-in after being stuck on the same image for too long. Modern LCD displays are not susceptible to this risk, and also boast higher-quality images anyway, rendering screensavers a thing of the past. However, if you’re still rocking an old CRT or plasma display – or just like the aesthetic of the screensaver – it’s still entirely possible to access it on Windows 10. Here’s how to set it in 6 super easy steps.
If you already know how to set it, but just want some cool new screensavers to install, we’ll get to that at the bottom.
How to create a Windows 10 desktop shortcut to use your photos as a screensaver
Read now ►How to enable screensaver
1. Open Settings.
Go to your Settings menu either by pressing the Windows Key and scrolling or typing “settings” or simply press Win+I.
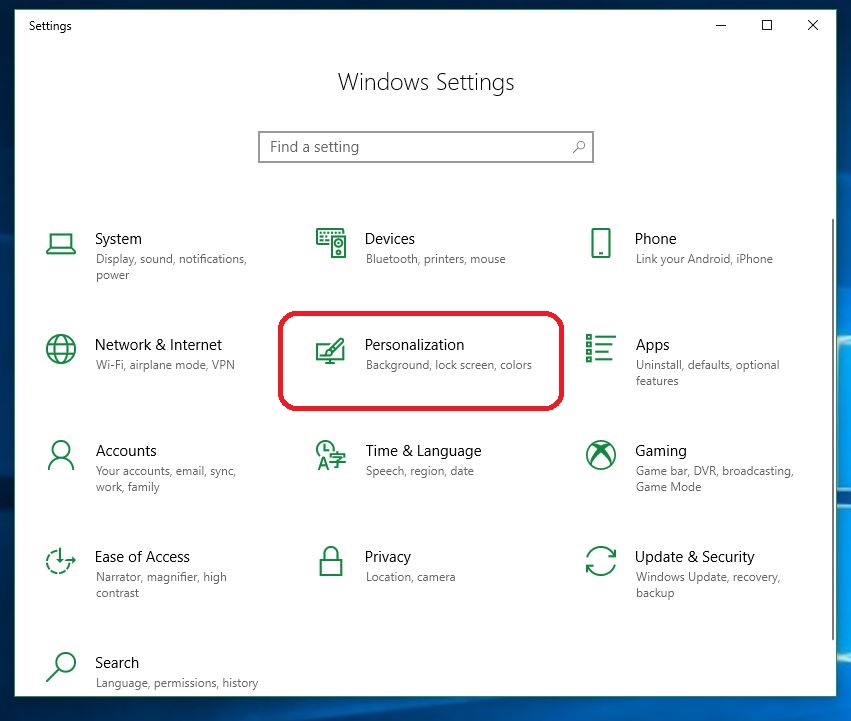
2. Click on Personalization.
Front and center on the Settings page you’ll see ‘Personalization.’ Click on that to open the next menu.
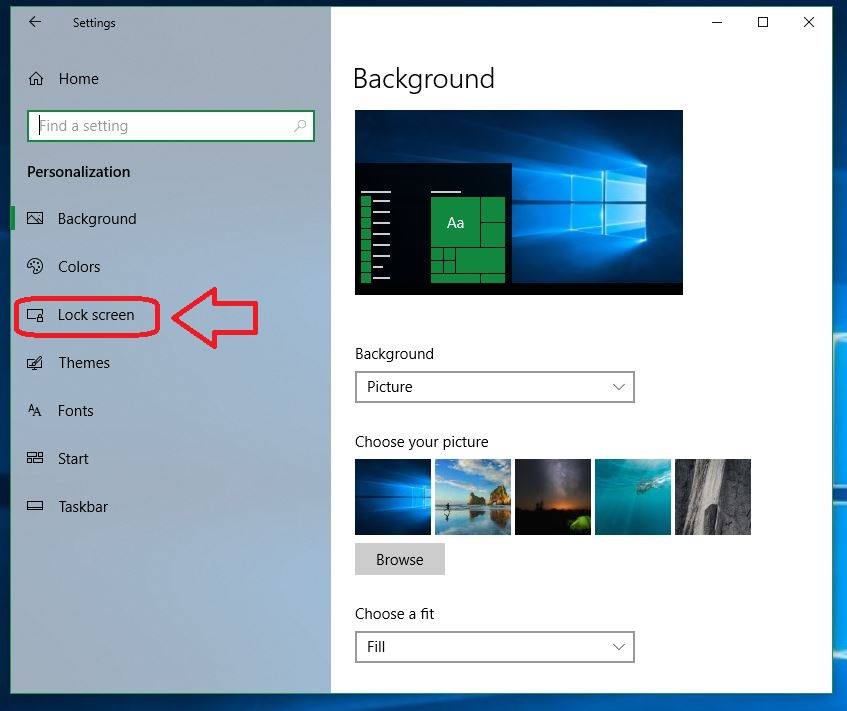
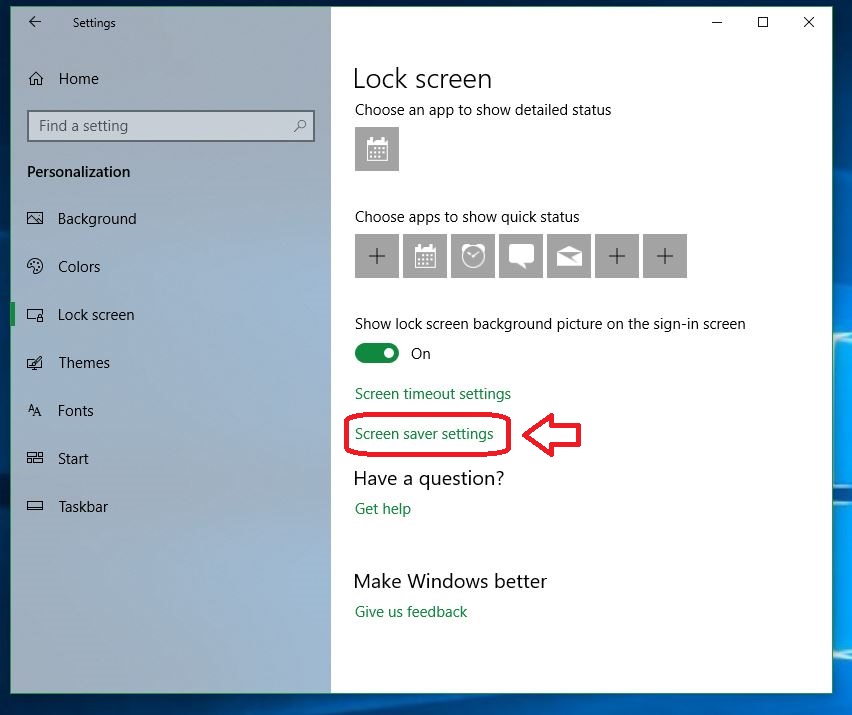
3. Click on Lock screen.
The Personalization menu has a few neat features you can play with, including new background pictures, adjustable contrast settings, fonts and sound effects. On the left rail you’ll see a ‘Lock Screen‘ option. Click that.
4. Open screen saver settings
Scroll down to the option in green “Screen saver settings.” Click the link and it’ll take you right to the screensaver.
5. Select the screen saver you want to use.
Here’s where the important stuff starts. The monitor image up top shows a preview of your current screensaver. By default it’s set to ‘none,’ but that’s no fun. Click the drop-down and you’ll be able to switch between a variety of choices: Bubbles, colored waves, a spinning “Windows 10,” Photos, and Ribbons.
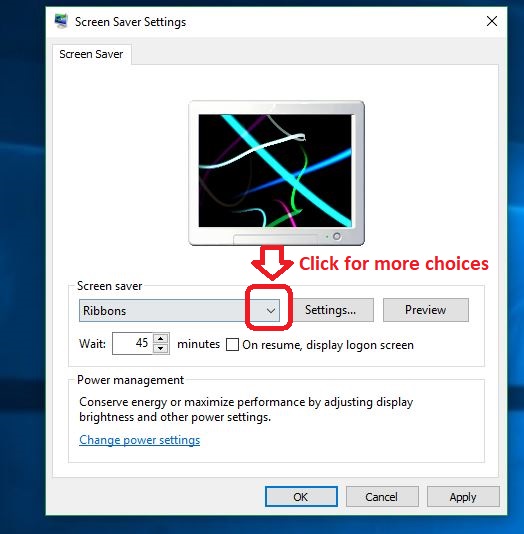
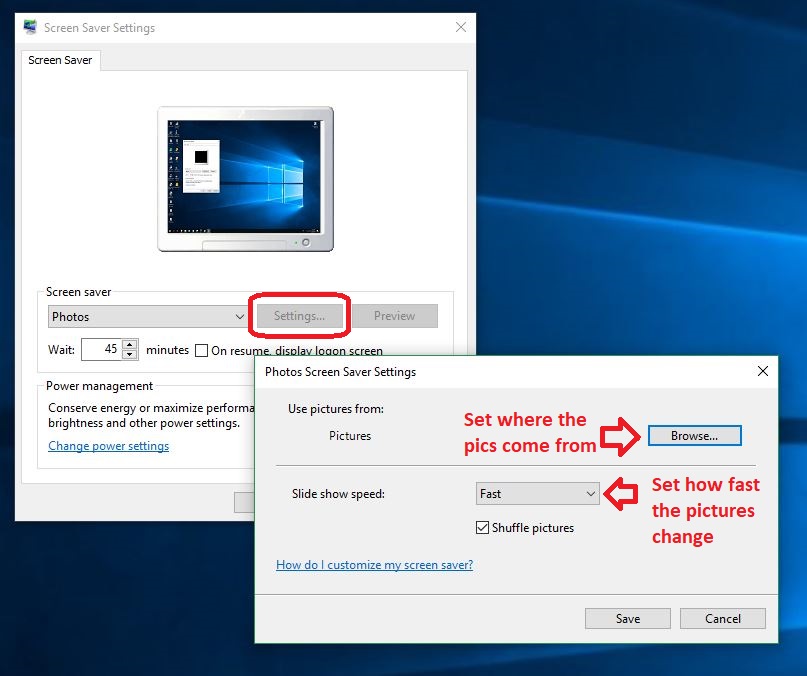
Pick the one you like and test it out by hitting the ‘Preview’ button to the right. If you chose ‘Photos’ you’ll also get some extra options from the ‘Settings’ button, which allows you to set and toggle shuffle as well as the folder the images are being pulled from.
Lastly, be sure to set the wait time before your screensaver kicks in. To do this simply arrow up or down the minutes in the window under the drop-down. This will determine how frequently your screensaver triggers.
6. Apply your choice
Hit ‘Apply’ on the bottom right of the window and you’re done!
One more detail to note is that your current power settings play a part in this too. Running your computer at high power will trigger your screensaver quicker than keeping it on low power. Click OK to close out and enjoy your newly activated screensaver! To quickly adjust it in the future just hit Win key and start typing “change screensaver.” The top option that comes up will take you right back to the screensaver settings menu.
How to find more screensavers
Windows 10 gives you a handful of screensaver options from the start, but there’s a world of other options out there. Finding them is as easy as a Google search. They’ve got everything from a crackling fireplace to the nostalgic 3D pipes to fish swimming across the screen (your cat will love this one).

There’s even an adorable pug who’ll sit there and lick your screen. Browse until you find the one that’s right for you, or scroll through this gallery of top-rated photos to add to your photo reel.
And there you have it! Set up your screensaver and liven up your Windows 10 with a little personality and character.

You may also like
 News
NewsBattlefield 6 is not doing well with one of its most popular modes, according to its design director
Read more
 News
NewsHow to Use Gemini to Analyze Sentiment for 1,000 Customer Reviews
Read more
 News
NewsThe next big exclusive from Sony will have something to say at the Game Awards
Read more
 News
NewsThe Spirit of Giving: How to Donate Safely Online This Christmas
Read more
 News
NewsThe arrival of Microsoft games on PlayStation has been fruitful thanks to a specific game
Read more
 News
NewsThe creator of Tekken leaves Bandai Namco
Read more