Editing video is not an easy task. However, thanks to programs like Adobe Premiere Pro, we can create our own projects in a simple yet professional way. That’s why Premiere Pro is one of the most used editors for movies, series, and more. In fact, did you know that movies like Deadpool and Terminator: Dark Fate were edited in Adobe Premiere Pro?
Well, it’s likely that cinema movies are a bit out of our reach, but we can still create our own projects. With that in mind, in this article we are going to focus on one of the most important aspects of any video: sound.
When recording with a mobile phone or camera, it is normal for videos to have much more unwanted noise. It doesn’t matter if we have additional microphones or other more specific equipment, it is difficult for the sound we capture to be completely clean. Luckily, with Adobe Premiere, we can eliminate any type of noise from our projects in a fairly easy way. If you want to know how to do it, stay with us and we will show you.
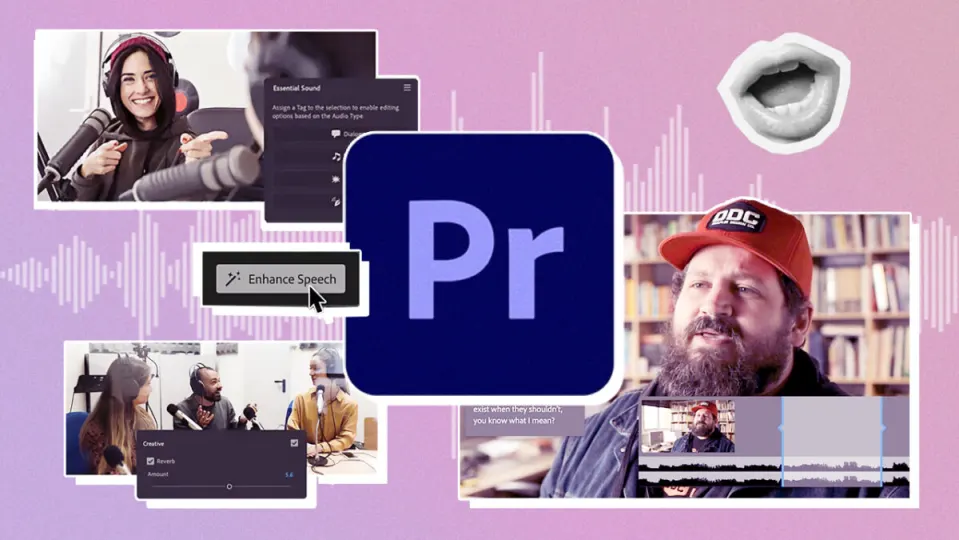
Clean your sound with studio-worthy editing: this is how Enhance Speech works
Adobe has incorporated the benefits of artificial intelligence to provide much more powerful features to its programs. This is the case of Enhance Speech, one of the most interesting innovations of Premiere Pro. Now, you can magically remove noise and improve dialogue clips to make them appear as if they have been recorded in a completely professional manner. As simple as it sounds.
With Enhance Speech you can improve the quality of voices with just one click. Additionally, you can also adjust the Mix Amount to control its effect. To apply it to your videos, you just have to follow a couple of very simple steps:
- Select the audio clip you want to enhance. Enhance Speech works exceptionally well with dialogues.
- Now, open the Essential Sound panel.
- Finally, select Enhance to start applying the effect to the clip.

By doing this, a time bar will appear above the Essential Sound panel indicating how long it will take to enhance that clip. The process always runs in the background, so you can continue editing other parts of the video while you wait. When finished, you will notice that the dialogue will sound more clear.
“Repair” or improve your dialogue tracks
Adobe Premiere Pro has numerous features to make the most of our recordings. It doesn’t matter under what conditions it has been recorded: within Premiere, we can reduce noise, vibration, and the most annoying sounds. Just follow these steps:
- Take the audio clip you want to enhance to a track in a multitrack session.
- Select it and then go to the Essential Sound panel. Specify that the clip is Dialogue. Finally, click on Repair.

Within Repair, we will find a quite complete menu with multiple settings to choose from. In case you want to eliminate the noise, you will have to go to Reduce Noise. It works especially well to remove background murmurs or sounds like clicks or hits. For vibrations, choose Reduce Rumble. If it is the buzzing that bothers you, select DeHum. Premiere Pro gives you the option to reduce even the sound of the S through DeEss. To eliminate the reverberation, choose Reduce Reverb.
Improving (even more if possible) the clarity of a dialogue track is possible with another additional option: Clarity. To apply it, first select the audio track and then go to the Essential Sound panel. Just like before, select Dialogue and then Clarity. When expanding the Clarity panel, you will see a lot of interesting options:
- Dynamics: here you can expand or reduce the dynamic range of the recording.
- EQ: it is used to increase or decrease selected frequencies in your recording. If you are not satisfied with the preset adjustment, you can change it in Effects > Audio Effects > Graphic Equalizer.
- Enhance speech: does what it says, improves the voice. Premiere Pro allows you to specify if the speaker’s voice is male or female to process the recording in the best possible way.

Remove all the words that you don’t need
When we are in the editing table, it is normal to see that certain things we had recorded do not fit as we wanted. Now, that dialogue or speech seems too long. If only we could remove those extra words… Well, with Adobe Premiere Pro we won’t have to dream anymore thanks to Text-Based Editing.
In most projects, the first thing we usually do is place the audio and video clips on the timeline and organize them. This way, we create a kind of “rough” montage to see, simply, where each piece would go. With Text-Based Editing, the process is even simpler: thanks to this functionality, we can edit the transcription of a video and have the changes take effect in the same video.
This is how you can apply it to your project:
- Open Adobe Premiere Pro and create a new project according to your objectives. Make sure to save it in a permanent location so that your data is not lost at any time.
- Now, import all the material you are going to use in your project. When you do this, make sure to keep the Automatic transcription option enabled.
- If you don’t know how to import your resources, here are several ways: one of them is by selecting Import, an option you will find in the File menu. Another way is to search for the material from within Premiere Pro itself through the Media Browser. Dragging the clips into the program will also work.
- At this point, you can select the language (under Language), speaker labeling options, and transcription preferences (Transcription preferences).
- Once the program has transcribed the dialogues, open the Text-Based Editing space to review the text and make it to your liking.

If you want to transcribe all the clips, you can do it like this:
- Just like before, open Adobe Premiere Pro and create your project.
- Before importing any footage, activate the Automatic transcription tab in the Import Settings panel. From here, you can select the language that Adobe Premiere Pro will work with for transcription. If the video is in Spanish, for example, you should select that language. If you’re not sure, check the option for Enable automatic language detection.
- Once the transcription is ready, go to the Text-Based Editing panel to review the text.
Thanks to Text-Based Editing, you will be able to get rid of the parts that are not interesting to you or lack importance.
And what if we only want to transcribe a specific part of a video? In that case, you can do it like this:
- Open the Text-Based Editing panel. In the Project panel, double-click on the clip you want to transcribe. If you can’t find the Text-Based Editing panel, go to Window and click on Text.
- In the Text panel, click on Transcribe.
- You can select the source language and have Premiere Pro classify the different voices (if any) in a clip. This way, you’ll know who is speaking at all times.
- Once the process is finished, the dialogue will appear in the Transcript window.

Many times, transcriptions will not be perfect. Premiere Pro allows you to edit and correct them if necessary.
This is just the tip of the iceberg of everything you can do with Adobe Premiere Pro. And the best part is that you don’t need expensive microphones or high-end equipment. With the help of artificial intelligence, sound editing in Premiere Pro becomes easier and more intuitive than ever before.
If you want to try out all these tricks we have given you in your projects, you have a limited-time free trial available. Adobe offers this option to all new users who have never tried the program before. Afterwards, you will have to pay a monthly subscription that you can cancel whenever you want. If you want to know more, visit the Adobe page and find out about all the available offers.