News
Save a Moment: Step-by-Step Guide to Taking Screenshots in Windows 10 and 11
Taking a screenshot in Windows is easy, here's how.

- March 17, 2023
- Updated: July 2, 2025 at 2:48 AM
Taking a screenshot in Windows is the most normal thing in the world at this point. Imagine that one day you are playing Hogwarts Legacy and you want to show your friends the impressive views of Hogwarts castle. Or you have seen an outlandish news in an online media and you want to share it directly with your Twitter followers. Just take a screenshot and you’re good to go.
However, there are many people who do not know how to take screenshots in Windows, so it never hurts to remember all the possibilities we have at our disposal. Here are four ways to take screenshots in Windows 10 and Windows 11.
Pressing the Print Screen key
The classic. The one of a lifetime. The “old reliable” one. The Print Screen key is completely indispensable on keyboards even today, with other ways of taking screenshots (as we’ll explain below). With the press of a single button, you can save a snapshot of everything you see on your monitor to your clipboard.
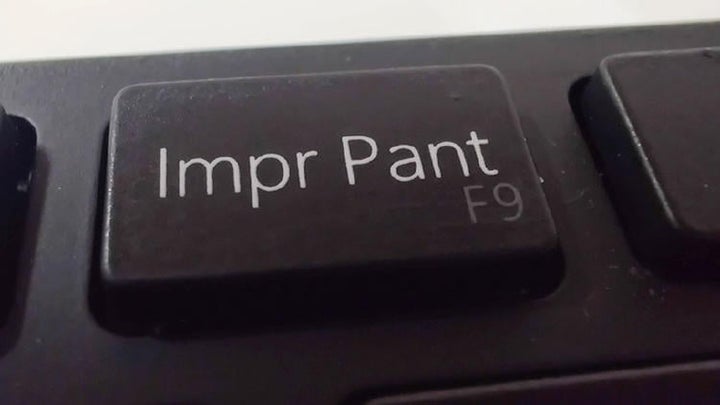
Note that Print Screen only saves the screenshot to the clipboard, it does not save it as an image file. For this, you will have to resort to our dear friend Paint or other editing tools, such as Adobe Photoshop. Also, in case you have more than one monitor, Print Screen will make a joint horizontal capture of what you see on all monitors, so if you want to save the capture of a specific monitor, you will have to crop the image before saving it.
Using the Snipping Tool
The ‘Snipping’ tool (called ‘Snip and Sketch’ in Windows 10) is a native Windows 11 app that will allow you to create, as its name suggests, snippets of everything we see on the screen. Using it is as simple as typing “snip” in the Start search bar and selecting it.
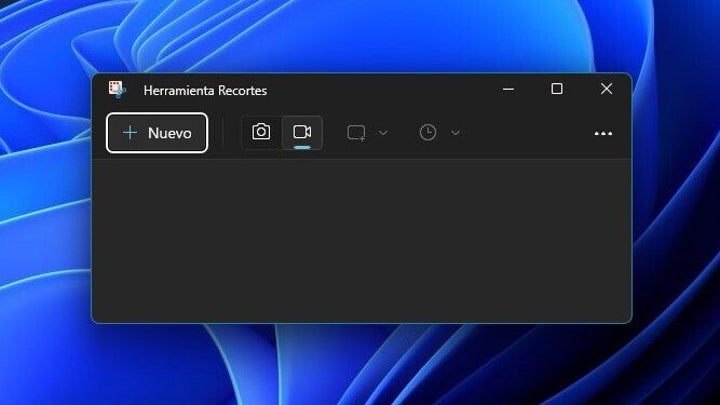
Once opened, we only have to click on “New” to create the screenshot we want. We will have four options: full screen crop, which works like Print Screen; window crop, which captures a specific window of the ones you have open; free-form crop, which allows you to crop the capture to your liking, and rectangular crop, which allows you to crop the capture in the shape of a rectangle.
Using the Xbox Game Bar
The Xbox Game Bar is a native Windows 10 and Windows 11 app that will be superimposed on our screen and includes several options, oriented both to our experience playing video games and to the common use of the PC. One of these functions is precisely to take screenshots and save them comfortably on the PC.
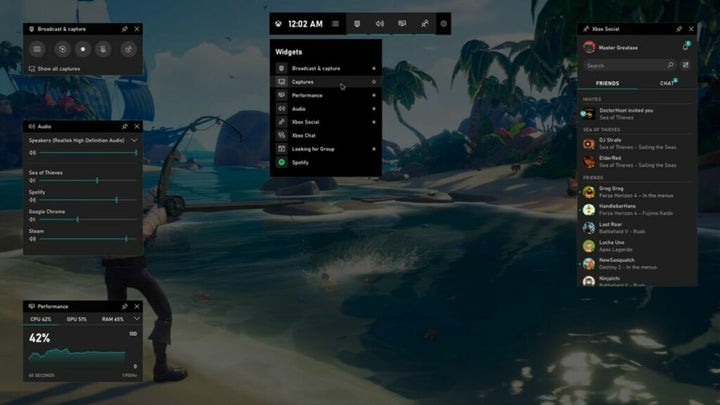
To use it, you just have to press the Win + G button combination, or look for it in the Start menu as “Xbox Game Bar”. When it appears, just go to the “Capture” window, which will appear in the upper left corner, and click on the Capture Screen icon. Once done, you will be able to see the image saved in the Vídeos\Captures folder on your PC.
Using a third-party application
Even with the simplicity of the other methods, there are those who prefer to make use of external programs to take screenshots, usually because they usually have many more options than the native methods we have discussed. Of the many programs available, one of them is Snagit, which we have already mentioned above.
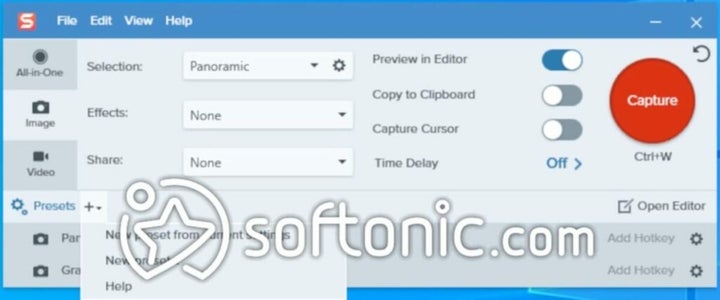
Snagit is a paid program for taking screenshots that also has an initial 30-day trial version to see its features without paying anything. Besides having a wide variety of options to make screenshots and edit them, Snagit also allows you to create videos from images, something very useful if, for example, you have to create a presentation for a class work.

Publicist and audiovisual producer in love with social networks. I spend more time thinking about which videogames I will play than playing them.
Latest from Pedro Domínguez
You may also like
 News
NewsFuel Your Instagram Feed: How Adobe Stock’s Infinite Library Powers Your Creativity
Read more
 News
NewsChatGPT Wrapped: a year-end review of how we use AI
Read more
 News
NewsWhat if there were a solution for the sale of Warner that satisfied both Netflix and Paramount?
Read more
 News
NewsThe director of Fallout: New Vegas is not a fan of how Dungeons & Dragons is represented in Stranger Things
Read more
 News
NewsSigourney Weaver believes that this cult science fiction movie did not succeed because they tried to make it for all audiences
Read more
 News
NewsSteven Spielberg thought that John Williams was laughing at him when he heard the most iconic melody in the history of cinema for the first time
Read more