So, you’ve decided to become a professional screenwriter? Great! Final Draft corners the market on professional screenwriting software, and their .fdx files are essentially required to work as a professional in the entertainment industry. All that aside, their program also works well and offers the intelligent platform you’d expect from a respected program.
Of course, if you’re new to screenwriting, consider using the Final Draft free trial or downloading Celtx for free: both of these options can help you prepare before deciding whether to spend about $250 for the complete version of Final Draft 10.

How to start screenwriting for free with Celtx
read now ►However, if you’re committed and ready, continue reading. We’ll go through the basics of Final Draft and what options are available:
Getting Started
First, download Final Draft online. You can grab it here:
NOTE: Final Draft is purchased and downloaded separately. Purchasing gives you a code, which should be entered once the application first opens on your desktop or device. ALSO: don’t buy their Final Draft USB drive, it’s a terrible deal for a 2GB flash drive and a free installer. For about $20, just buy a great 64GB flash drive from Amazon.

After signing into your new account, you will see the opening screen. We’re using a Mac, so PC users may have a slightly different experience.
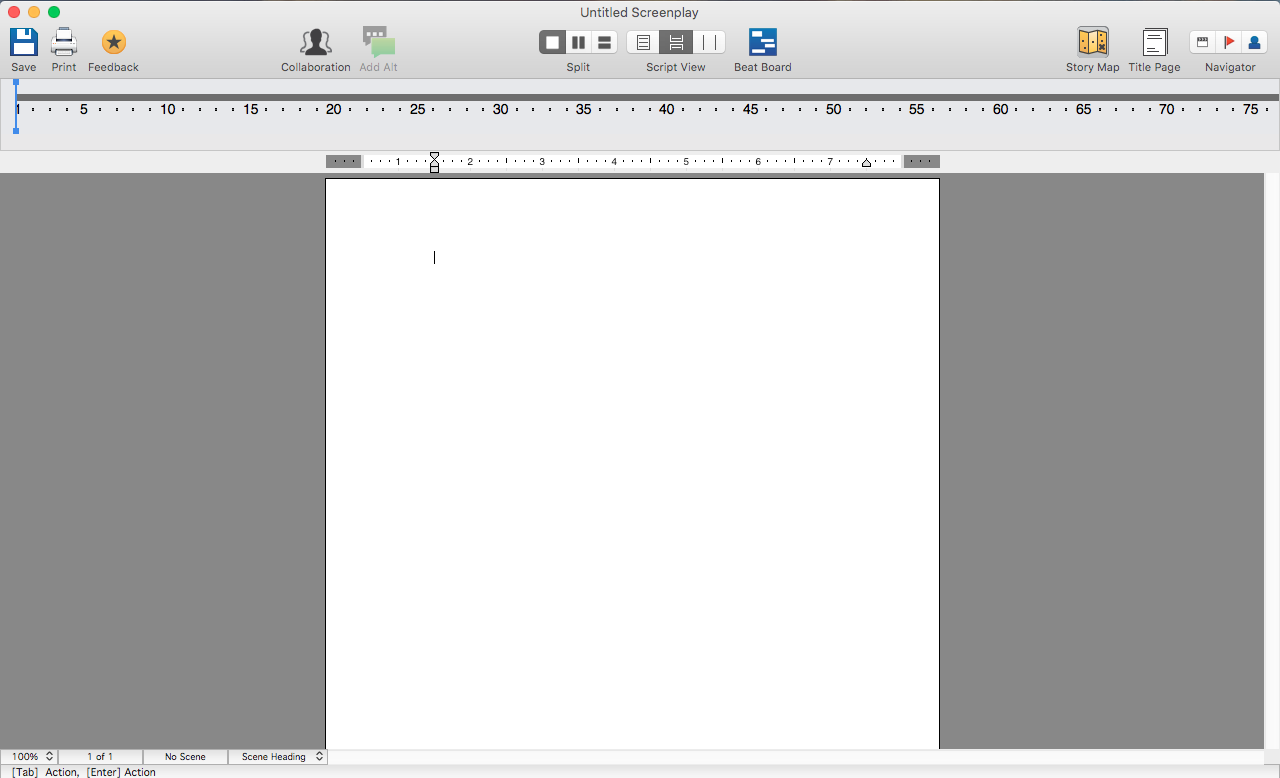
If you’re like us, this moment is both exciting and scary! Unlike many other word processing software, screenwriting programs are generally left blank so the user can increase their focus, with the side effect of mild anxiety at first.
Also for that reason, Final Draft leaves out many other things. For example: note the lack of options to choose font or type size. Screenwriting format ensures that one page equals one minute, so the standard settings can’t be changed.
Writing
If you want to jump right in, go for it! Be warned, we’re going to assume you have some experience with screenwriting moving forward.
Final Draft makes it easy to switch between location, action, character, and transition. You can cycle through in this order by pressing the “tab” button. However, pressing enter can help you move from location or character to action and dialogue, respectively. In any other situation, it allows you to select which element you’re writing. This takes practice, but there’s always a bar at the bottom left showing what button does what:
![]()
Everything else aside, using your keyboard to type and move among elements in this way can lead to a complete screenplay. Seriously, these basics are the only necessities to finish a project!
However, the following functions make life easier as well:
Top Bar: Main Functions
The first three buttons on the top left allow you to Save the document, print, and provide feedback on Final Draft’s online website. While saving, you’ll need to provide a name for the document.

The next buttons cover collaboration and alternate text. Collaboration allows users to work together, an important feature for writing teams! “Add Alt” is meant specifically for dialogue: while typing a character’s lines, this gives you the ability to include other statements. This might help when you have a few quippy one-liners, but can’t decide which to use.

The Middle Section holds some of the most important settings: script split, script view, and beat board. The “Split” option divides the window so you can view your document in two places at the same time – great for checking continuity errors! The view setting shows your page as either a white script with page breaks included, the same pages with gray outside the margins, and a continuous script without breaks. Finally, the beat board creates a virtual workspace where you can create notecards to flesh out the scenes of your project, or simply make observations.

The far right corner has the buttons for story map, title page, and navigation. Hitting “Story Map” shows or hides the checked timeline above your page. “Title Page” helps edit the title page alone, which isn’t otherwise visible. Finally, the navigator provides three ways to search through your 120-page screenplay: scene, notes, and characters.

Some of these features will appeal to specific users. Others, like the Navigator section, become more important as the screenplay increases in size. All of them have great potential, so give them a chance1
The Rest
Aside from these items, there are a few others of note.
Within the program, a small box on the bottom left shows the size of your viewing window, your current page number and scene, as well as the type element being used.
![]()
You should also have a number of options provided by your laptop. Macbooks generally have the File, Edit, View, and other such buttons at the top left of the screen, outside the document window. We’re not going to discuss all these, since the bar contains too many functions, is computer-specific, and shows up for almost all programs. Still, remember to check what your device provides.
The hardest part of screenwriting will always be the writing itself. Final Draft helps by removing 99 percent of all other hassles: formatting, planning materials, navigation, etc. With a small amount of familiarization, it will be your loyal companion on the writing journey!