How To
How to: Apply a sketch effect to your photos
- November 14, 2008
- Updated: July 2, 2025 at 9:26 AM
Sometimes you don’t need to apply highly complicated effects to your photos to make them stand out. A simple sketch look like the one explained in this tutorial is more than enough to make a dull image look fancier and more original. Plus it’s really easy to apply! Want to learn how? Follow these simple steps and you’ll be creating beautiful color sketches out of your photos in no time.

1. Open the photo you’ll be working with and duplicate the background image.
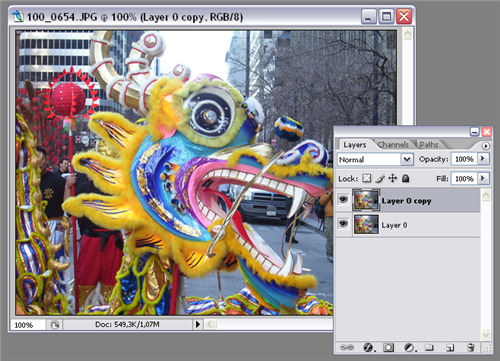
2.Change this duplicate layer’s blending mode to Overlay and lower its opacity down to 60%.

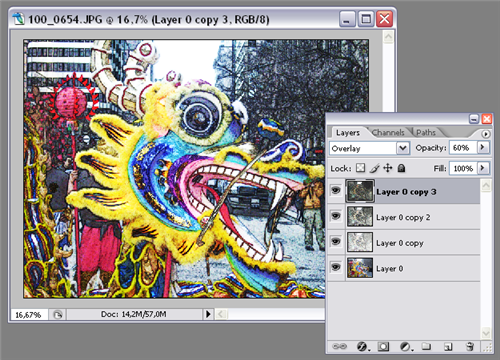
3. Then go to Filter > Stylize > Find edges to apply this effect (no settings required).

4. Now here comes the funny part: press Ctrl+J to duplicate the active layer again, and then Ctrl+F to apply the same effects to the newly created layer. Repeat these two keyboard shortcuts once more so you end up with four layers (the original one plus four copies).
5. The sketch effect is ready!
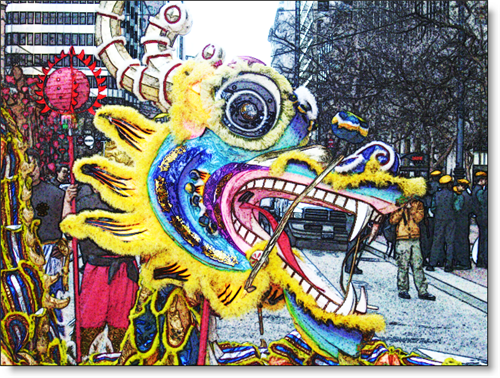
6. But the tutorial is not over yet. If you want to tweak the result a bit further, try applying a Blur effect (Filter > Blur > Gaussian blur) to the third layer – the “copy 2” one – to obtain a softer, gentler look.

7. Or you can also try an Emboss effect (Filter > Stylize > Emboss) on the last layer – the “Copy 3” one – for a more textured sketch.


You may also like
 News
NewsZootopia 2 dominates the Chinese box office, overshadowing the major national release of the season
Read more
 News
NewsThe Boys already has a release date for its fifth and final season
Read more
 News
NewsGTA6 will take time to arrive, but this fan is creating an entire new trilogy within GTA5
Read more
 News
NewsDaniel Kaluuya confirms that we are far from having seen the last of Spider-Punk
Read more
 News
NewsTeam Fortress 2 Classic returns with a change that is confusing players
Read more
 News
NewsMark Hamill confesses that he leaked his phone number in one of the Star Wars movies
Read more