Smart filters and adjustment layers: A complete guide

- April 30, 2025
- Updated: July 1, 2025 at 9:46 PM

If there is one thing that Adobe Photoshop is known for, it is its vast array of options and adjustments. Thanks to these, any user can materialize what they have in their mind, as long as they know how to handle these tools. Today we will focus on two in particular: Smart Filters and Adjustment Layers.
Imagine, for example, that you want to edit some photos you took of yourself. Perhaps you want to adjust your skin tone, improve the contrast, or soften the background with a slight blur. Thanks to Smart Filters and Adjustment Layers, you can modify your photo with a couple of clicks and change any adjustment on the fly, without having to start from scratch constantly.
If you don’t know anything about them, don’t worry: we will see what they are, what they are for, and how to use them to make your edits much better.
What are Smart Filters and how can I use them
The Smart Filters are filters applied in an “intelligent” way to a layer. This means you can modify, adjust, or remove the filter at any time without damaging the original image. This is known as non-destructive editing.
In summary, if we apply any filter (like Blur or Noise, for example), it would directly affect the layer, making it impossible to change later (only with our beloved CTRL + Z). With Smart Filters, everything is reversible.
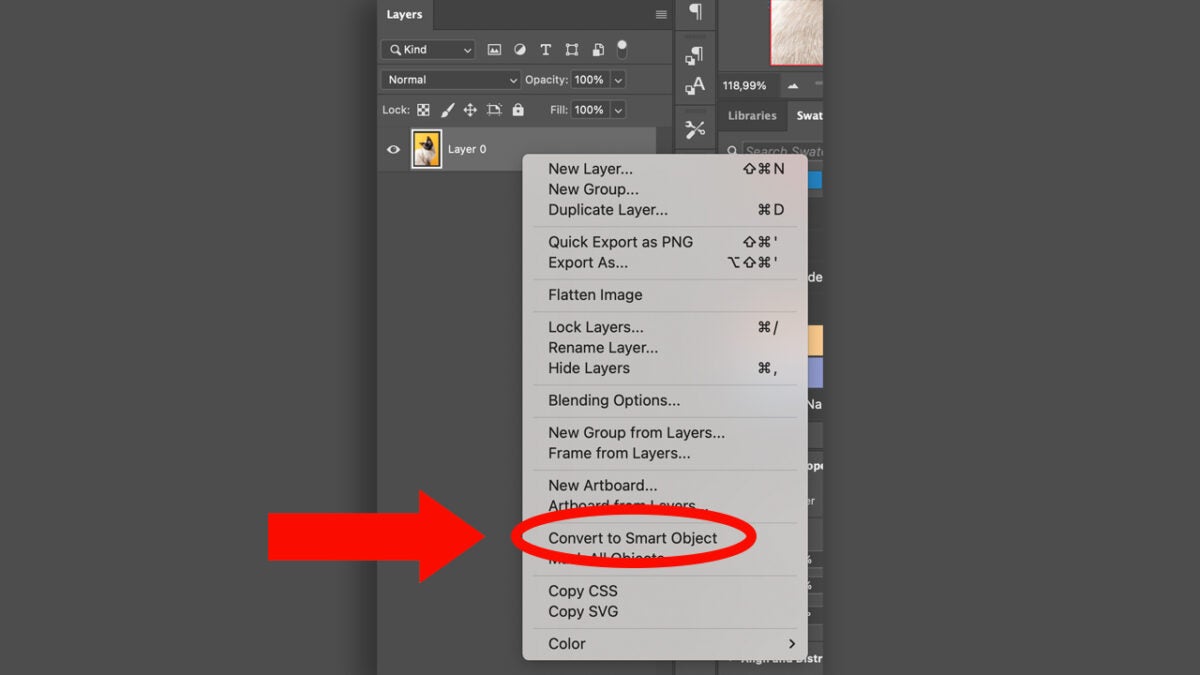
- To start, convert the layer into a Smart Object. To do this, right-click on the layer and choose Convert to Smart Object.

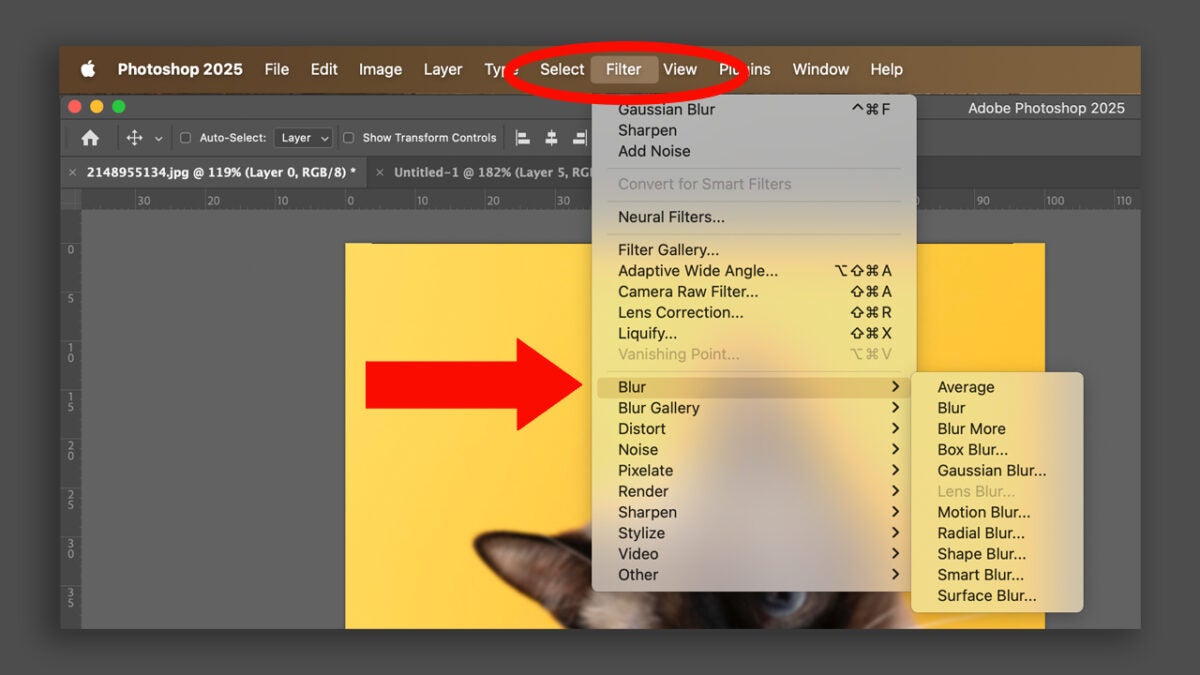
- Then, go to Filter, which is located in the top menu and choose the effect you want (Blur, Distort, Pixelate, etc.).
- Automatically, the filter will be applied as a Smart Filter. You will see it right below the layer in the Layers panel.

To modify it, you can double-click on the filter. You can also hide it as if it were another layer.
Adjustment layers: This is how they work
The Adjustment Layers or Adjustment Layers are another tool that, like Smart Filters, will help us to edit without altering the original image. With them, we can change things like brightness, contrast, hue, saturation, levels, curves, and much more. It will be very useful for experimenting with different light and color effects without affecting the base photo.
To use them, you just need to follow these steps:
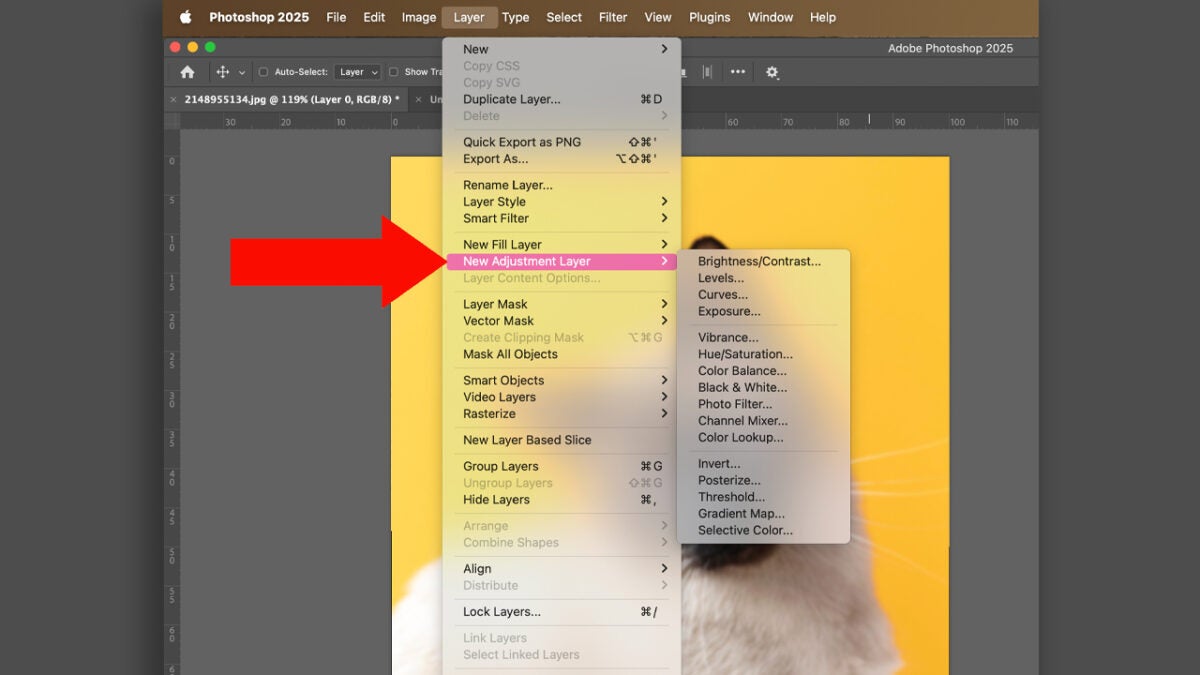
- Click on the icon of New Adjustment Layer at the bottom of the layers panel (it is a circle half white, half black). If you can’t find it, you can also go to Layer > New Adjustment Layer.

- Choose the type of adjustment you want: Brightness/Contrast, Hue/Saturation, Levels, Curves, Black & White… The list is long.
- Next, a new layer will be created on top of your image with the adjustment you have chosen.
Just like with Smart Filters, you can edit the adjustment by double-clicking on the layer icon. You can also use the layer mask that is automatically created to control where the effect is applied.
If you have never used them, you will see that Adjustment Layers will be very helpful when editing, designing, or drawing in Adobe Photoshop. Some of their advantages are:
- They are reversible: you can change your mind at any time.
- They give you more control: adjust each filter or setting without touching the original.
- They facilitate experimentation: try combinations of filters and settings without fear.
- They improve your workflow: you will work faster and more organized.
A practical case: use Smart Filters and Adjustment Layers step by step
Imagine you want to give your photos an older, vintage touch. Here’s how you could do it:
- Convert your photo into a Smart Object.
- Apply a Gaussian Blur filter as a Smart Filter and lower the opacity to your liking.
- Then, add an Adjustment Layer of Hue/Saturation and reduce the saturation levels a bit. Alternatively, you can also use the Black & White option.
- Finally, an adjustment layer of curves is applied to give a soft contrast.
At any time, you can adjust any of these steps without destroying your original photo. Additionally, you can group all the effects in a folder to keep everything well organized. Below, we leave you some tips that will also be helpful:
- Name your layers: Labeling your layers will make your design, editing, or drawing much more organized and easier for you to work on.
- Grouping layers will also help you with this.
- You can use the layer mask of Smart Filters to apply the effect only in the areas you want.
- Duplicate your layers to make quick variations and see other alternatives without risking losing the original photo.
As you can see, Smart Filters and Adjustment Layers are two essential tools for any self-respecting Photoshop user. They not only allow you to work non-destructively, but they also open up a world of creative possibilities. Experiment with them to achieve more interesting effects, knowing that you won’t lose your photo.
Artist by vocation and technology lover. I have liked to tinker with all kinds of gadgets for as long as I can remember.
Latest from María López
You may also like
 News
NewsOne of the most successful movies of the year premieres on HBO Max
Read more
 News
NewsNaughty Dog is back at it: they are already crunching for their next game
Read more
 News
NewsThe new Tekken champion is Japanese and is 92 years old
Read more
 News
NewsPedro Almodovar returns with a new movie that is very Christmas-like
Read more
 News
NewsLarian Studios will hold an AMA to clarify their stance on AI early in the year
Read more
 News
NewsSteam is giving away the most unimaginable Christmas game until December 21
Read more