In recent years, drones have just changed the ways through which the adventures are experienced and documented. From wide sweeping rugged coastlines to breathtaking aerial views of lush forests, these compact flying cameras have opened a whole new dimension of storytelling. Travelers can capture scenes with just a few taps on a remote control that were considered only accessible to professional filmmakers. Whether you are high up above a sunlit valley or gliding along the edge of a mountain range, drones allow you to see and share the world with perspectives as thrilling as they are beautiful.
While capturing such moments is great, it comes with the stress of preserving them. Just like any other advanced technology, drones are also subject to a few issues that might hurt the quality of your videos. Imagine returning from a perfect trip and finding out there were annoying glitches in your perfectly shot videos, or worse, that they wouldn’t play at all. Be it file corruption, unexpected technical glitches, or accidental deletion, all these can turn your digital memories into digital nightmares.
If that all sounds a bit overwhelming, don’t fret because there are ways your footage can be salvaged. This article will show you the common pitfalls people get themselves into when it comes to making drone videos and give some practical solutions on how to fix and optimize them. By the end, you’ll have the toolset and the knowledge to restore past adventures to their former glory, ensuring that not only are they remembered, but shared and re-lived for decades into the future.
Common Issues in Drone Videography: What Could Possibly Go Wrong?
As magical as drone footage can be, it’s not without its challenges. The first line of defense for your aerial videos is knowing some common problems to watch out for. Whether surprises like equipment suddenly not functioning or an accidental slip-up, having an idea of what to stay on guard for helps you prepare and, more importantly, recover, when things don’t go as planned.
When Files Get Corrupted…
One of the most frustrating issues drone videographers face is file corruption. This can happen for a variety of reasons, often without warning. Imagine you’re in the middle of recording a stunning sunset when your drone suddenly loses power. The abrupt shutdown can leave your video file incomplete, leading to corruption. Other culprits include incomplete data transfers—when footage isn’t fully written to the memory card—or hardware malfunctions within the drone itself. The result? A video file that refuses to play or one that displays only a few seconds of glitchy footage before crashing.
File corruption is particularly vexing because it’s often invisible until you try to view or edit the footage. To minimize the risk, always ensure your drone has sufficient battery life before flying, and avoid removing memory cards or shutting down the drone while it’s still writing data.
Glitches and Artifacts
Even if your files are not evidently corrupted, you could face visual issues such as glitches and artifacts. Those issues might be frozen frames, pixelation, or irritating audio and video sync problems detracting from the overall quality of your footage.
Glitches often occur as a result of recording errors—for example, the focus of a drone camera can wane or encounter some lags in processing for a couple of seconds. Artifacts may also occur where the footage has been compressed, or after the transfer from one device to another. These issues harm the aesthetics of your video and make editing a living hell, especially when they happen randomly within an otherwise perfect shot.
To reduce the risk of these visual disturbances, ensure your drone’s firmware is up to date, use high-quality memory cards with fast write speeds, and handle footage transfers with care.
Lost or Deleted Files
Not many things are as disheartening as the realization your hard-earned footage is missing—whether this is due to a memory card problem, accidental deletion, or simply a formatting error, files lost in such a manner feel like they’ve disappeared into thin air.
Such losses often happen during a rush—maybe you formatted the memory card setting up for a new shot, or the storage device malfunctioned while transferring. Human error allows for some wrong moves here and there too. All it takes is one or two clicks without thinking…
Back up your footage from time to time and do it in several places, including the external drives and the cloud storages. And when handling files, just take that extra time—check twice—to make sure you’re not deleting something really important.
Being aware in advance can help you protect your drone footage and subsequently be well-prepared to tackle any issues that might arise.
Back Up Your Drone Videos: Take These Proactive Steps for Peace of Mind.
Prevention is always better than cure. Not all risks are predictable, but there are proactive steps which will go a long way in reducing the potential chance of issues arising with your footage. Here’s how you can protect your videos before problems arise.
Handle with Care: Protecting Your Equipment and Footage
The first line of defence in protecting your drone footage all starts with how you treat both your drone and storage devices. Drones are fragile pieces of equipment that carry sensitive sensors and cameras, which can be easily damaged by rough handling or through bad storage techniques.
- Proper Storage: Always keep your drone in a padded and secure case whenever it is not in use. This way, it will not only be protected from any form of hits or drops, but also from different kinds of environmental factors, such as dust and moist conditions.
- Careful Handling of Memory Cards: The memory card is your most valuable asset for protecting your footage.Handle it properly; do not let bare skin touch the metal contacts, and never remove the card while the drone is still on or processing. Keep your memory cards cased in a safe container and protect them from excessive temperatures, as it can affect their reliability.
- Safe Transfers: After transferring footage from the drone to a computer or other storage device, make sure to click “eject” before removing the card to know for sure that it is not currently being written to.
Back It Up: The Golden Rule of Data Preservation
Regular backups are the easiest way to protect yourself from data loss. An important term to remember is redundancy. What is redundancy? It’s just a way of saying you should keep multiple copies of your data in different locations. This way, if one device fails, you have fallbacks.
- Immediate Backups: As soon as possible after every shoot. Ideally, make at least three copies: one on your primary storage device (e.g., an external hard drive); another on a second device; and the third should be off-site, such as cloud storage.
- Automated Solutions: These are services that will sync your footage to cloud storage. This is handy because it avoids the human error of forgetting to initiate a backup. Even if your physical storage devices fail, you’ll still have a secure copy online that can be accessed from anywhere.
- Regular Checks: Manually verify your backups to make sure they’re actually complete and accessible. Sometimes backups get corrupted too.
Keep Your Drone in Top Shape: Maintenance Matters
Regular maintenance on your drones prevents the type of technical problems that cause loss of footage. Drones are no different than any other technological equipment: they must be maintained to be kept operational.
- Firmware Updates: Manufacturers regularly release firmware updates to correct bugs, enhance performance, and increase compatibility with new memory cards or cameras. Keep your firmware for the drone updated to the latest version in order to avoid problems.
- Physical Inspection: Do a quick survey of your drone before and after flying. Look for signs of wear, cracks on the propellers, loose screws, or even dirt in the lens of the camera. Take care of the issues that may show up beforehand, and fix them before flying to avoid problems with your footage.
- Battery Care: The leading cause of incomplete recordings and file corruption is sudden power loss. Always keep your batteries nice and topped off before you go flying, replacing them if you notice any degradation, such as shorter flight times, or if they begin to swell.
Basic Repair Techniques: First Aid for Your Drone Footage
Even with the best preventive measures in place, someday you’re going to be afflicted with corrupted, glitched, or deleted drone footage. Before you freak out, know that there are several basic repair techniques you can try to salvage your videos. Be it built-in tools from your Operating System or from a command line utility or recovery software, they can occasionally bring your footage back.
Quick Fixes with Built-In Tools: Your First Line of Defense
When you have problems with your drone footage, the place to start is by looking at some of those tools you already have in your arsenal. Most media players and operating systems have some basic file repair functions that can recover a partly corrupted file.
- Media Player Repairs: Some of the media players, like VLC, have the capability to automatically repair some of the corruption issues. If you try to play a corrupted file and it finds that something is wrong, it may ask if you want to fix it. Often, this can be as simple as clicking on “yes” and letting the software get down to work.
- Operating System Utilities: Both Windows and macOS have utilities that will scan your storage device for file system errors and correct them. For instance, one could run the “Check Disk—chkdsk” utility in Windows and run it on a memory card or external drive that is possibly corrupted. On a Mac, run Disk Utility or use the First Aid feature to do the same thing. Sometimes these tools can fix problems when your footage looks corrupted.
Using Command-Line Tools: The Power of FFmpeg
FFmpeg is a utility that uses a command-line interface that, with a bit of knowledge, can help fix minor issues in video files. FFmpeg is an open-source utility that’s compatible with a huge array of video formats and operations including repairs.
Basic FFmpeg Repair Commands: If your video file is playable but has glitches or possibly A/V sync problems, then FFmpeg may be able to provide a solution. A basic command to re-wrap the video and audio streams into a new container, which often fixes these problems, is “ffmpeg -i inputfile.mp4 -c copy outputfile.mp4”. While this command does not do much more than re-wrap the video into a new file, it fixes problems that were due to a corrupt container.
Rebuilding Video Index: If your video plays, but you are not able to seek/scrub in it, then most likely the index is corrupted. The following command rebuilds this with FFmpeg “ffmpeg -i inputfile.mp4 -c copy -movflags +faststart outputfile.mp4”. The +faststart flag transposes metadata to the beginning of a file, allowing proper seeking and playback.
Restoring Deleted Files: Don’t Panic, Act Quickly
Deleting footage by mistake might feel hopeless, however, all may not be lost. Successful recovery can depend on two factors. The first factor is that the recovery process should be attempted as soon as possible. The second factor is that, prior to recovery, the storage device should be used as little as possible.
- Data Recovery Software: There are very reliable software recovery tools out there that you can use to recover the lost data. We’ll be recommending one below. These tools scan your storage device for recoverable files and allow you to restore them to a safe location.
- Steps to Follow:
- Cease Use of the Device: If, in any case, you come to realize that the file has been deleted, you should immediately stop using the memory card or the drive. This prevents new data from overwriting the deleted files.
- Choose the Right Tool: Install a recovery tool that works on your OS, and use the guided instructions. Find a tool with a simple interface from which you will be able to select your device, scan for files that are deleted, and then choose the files you want to recover. A complicated recovery tool can make things worse if you’re not sure what you’re doing.
- Save Recovered Files to a New Location: To avoid further corruption, always save the recovered files to a different storage device than the one you’re recovering from.
Stellar Repair for Video: Your Go-To Solution for Drone Footage Restoration
When your drone footage is on the brink of being lost to corruption, you need a tool that can go beyond basic fixes and deliver reliable, high-quality results. Stellar Repair for Video is exclusively designed for those moments when your file seems irreparable, hosting a powerful feature set capable of mending damages from minor faults to severe forms of corruption.
What Stellar Repair for Video Offers
What makes Stellar Repair for Video great is that it can handle cases of video corruption that would normally seem very hard to deal with. If your file seems to refuse opening, or has glitches and artefacts, or even suffers from an audio-video sync problem, then Stellar has tools to comprehensively deal with these problems. Moreover, the software supports a large number of video formats—including MP4, MOV, AVI, and many others—so it is more than versatile in dealing with footage from drones and cameras.
One of the key strong points of Stellar Repair for Video is the advanced algorithms, which are instrumental in reconstructing damaged or missing segments in your video file. Such a level of repair ensures footage is brought back to the finest quality, and most of the time, indistinguishable from the original uncorrupted version.
Getting Started: Installation and Setup
Getting started with Stellar Repair for Video does not require you to be technically skilled. Here’s how you use it:
- Download and Install: First of all, download Stellar Repair for Video from the official website. Installation is pretty easy: Follow the on-screen instructions and it will install within minutes.
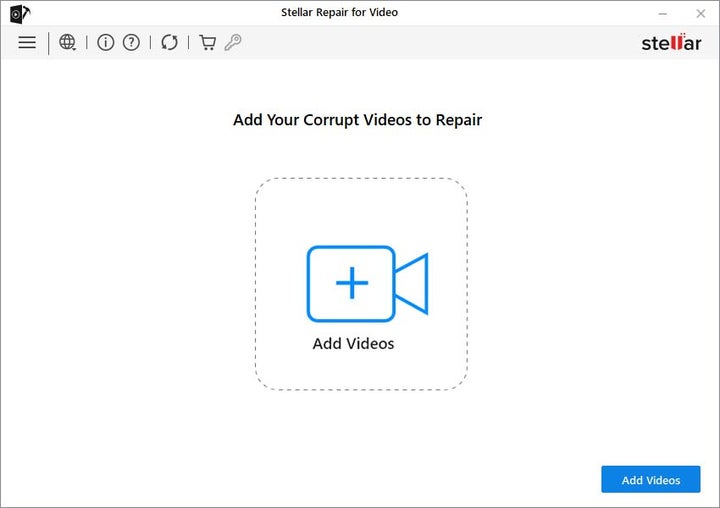
- Launch the Software: A clean, intuitive user interface awaits you, making it simple to check through the different repair options.
- Add Your Files: Pick files that you intend to repair together by selecting the “Add File” option. Stellar Repair for Video allows batch video repair, so you can pick multiple files at a time and conduct the repair in one move.
Fixing Your Footage: A Step by Step Guide
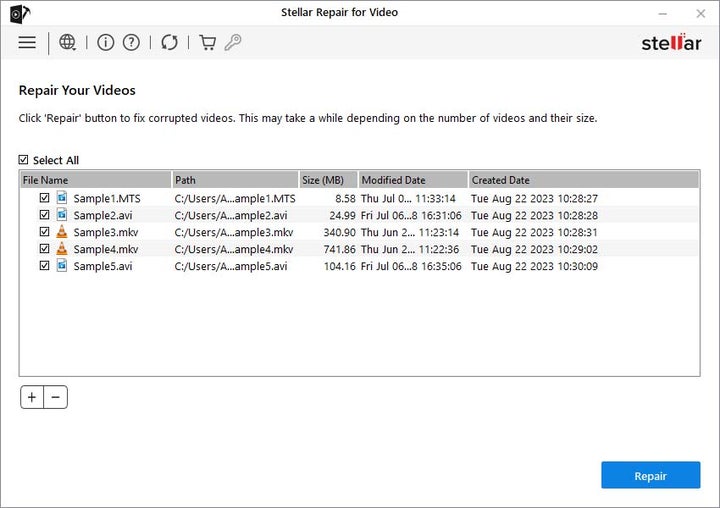
Once your files are selected, the repair can be carried out easily and efficiently.
- Start the Repair: Click “Repair.” Stellar Repair for Video will then go through an analysis of the files to identify and fix the corruption. You can watch through the real-time update where the progress of the repair being carried out on each file is shown.
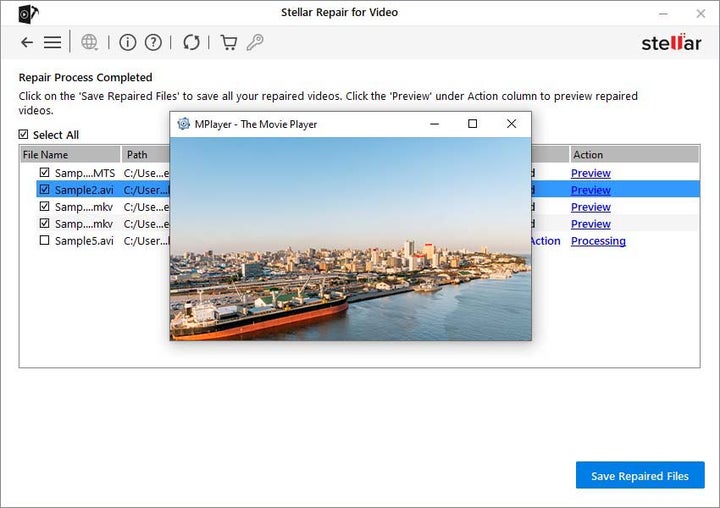
- Preview the Results: After repairing is finished, the results can be previewed. This allows you to check the repair quality before the file is saved and whether you are comfortable with the outcome or want to try again.
- Save the Repaired Files: Once you’re happy with the result, go ahead and save the repaired files. Save the repaired files to a different destination location on your system or to another drive; in no way should these files be saved in the same location. Stellar Video Repair gives an option where you can either save the footage in the same format as of the original file, or convert it into some other format.
Stellar Repair for Video: The Best Among its Competitors
Here just some of the reasons that Stellar Repair for Video is so trusted in repairing drone footage:
- Reliability: Stellar is one of the oldest names in the PC and Mac data recovery industry, and they’re a ISO 9001-2008 certified company, which is reflected in their software. It has been engineered to undertake complex repair tasks that other tools might fail at, hence providing assurance in restoring your footage.
- Ease of Use: Its advanced features do not come at the cost of usability. The interface is straightforward and intuitive so that you don’t need to be an expert to carry out a successful recovery of your footage.
- Versatility: From minor issues with your video files to severe deterioration, Stellar Repair for Videos is equipped to deal with it. It boasts large file support and can repair multiple files at once.
Stellar Repair for Video is an essential tool for anyone serious about preserving their drone footage. With its powerful features and user-centric design, it ensures that even the most corrupted files can be brought back to life, allowing you to focus on what really matters—capturing and sharing your adventures.
Best Practices for Storing and Sharing Your Repaired Drone Footage
Once you’ve followed through the process and properly restored your drone footage, it only makes sense to invest some effort into seeing that your hard work is properly stored and shared. Proper storage and sharing practices will go a long way in helping you maintain the quality of your videos and keep them for years to come. Here are key tips in ensuring you effectively manage your repaired footage.
Choosing the Right File Formats: The Balancing Act between Quality and Compatibility
Choosing the right file format is of great importance when it comes to storing and sharing your footage. The format can, for instance, affect the video quality and ease for sharing or editing the video.
- High-Quality Formats: If quality is king, then formats like MOV or ProRes are excellent. If your drone records in a RAW format, use that. These formats are mostly used by professional videographers, they keep more details and information on color—something very crucial for high resolution drone footage, but they’re not intended for sharing.
- Web-Friendly Formats: MP4, it’s perfect for sharing your videos online or on social networks. It strikes a good balance between file size and video quality, making it well suited for streaming and instant sharing. MP4 makes your video universally compatible, since it optimally supports both the hardware and software your audience may be watching on or using
- Choosing Wisely: While deciding on a format, have a think about what needs to be done with the footage. In most cases you’ll always want to keep a copy of the highest quality version of the file for archival purposes and editing. For everyday sharing or casual display, MP4 has always worked extremely well as a compromise between quality and size.
Compression Without Loss of Quality: Smarter File Size Management
Managing and sharing huge video files, like those high-resolution drone-footage files, can become hard and sometimes tricky. But compression doesn’t have to mean saying goodbye to good quality; here are ways to gracefully manage file size:
- Use Efficient Codecs: When compressing video, look for codecs that are more efficient and that do not degrade visual experience in the process. H.264 is a widely-used codec, which compresses a video with decent quality quite effectively. Even more efficient would be H.265 (HEVC), which gives the same quality in half the file size of H.264, but it takes more processing power to encode and decode.
- Adjust Bitrate: Your video’s bitrate will greatly influence both the file size and the quality of your video. As you reduce the bitrate, you decrease file size while introducing the possibility of compression artifacts. You’ll want to strike a balance where you have just a little less bitrate, making your file size tolerable without ruining the quality. Most video editing software will offer pre-sets in this domain, and you’ll most likely not have to crank it down on your own unless you really want that level of fine-tuning.
- Resolution and Frame Rate: If that is still too large, think about getting the resolution or Frame Rate lower. Options could be shrinking 4k footage down to 1080 or reducing the frame rate from 60fps to 30fps. The reduction in file size can be significant while not drastically losing any amount of detail or its fluidity depending on the medium you intend on showing the footage.
Safe and Secure Storage: How to Continue Safely Storing Your Footage
When your footage has been repaired and compressed properly, how you store it is important. Below are a few tips for long-term storage:
- Use Multiple Backup Locations: Trusting your footage with one storage device is playing with fire. Back it up in more than one place. Ideally, save your files on an external hard drive, a cloud storage service, and one other off-site location, like a separate hard drive at your friend’s house or in a safety deposit box
- Cloud Storage Solutions: Cloud storage can come to the rescue because it offers redundancy and accessibility. Use services like Google Drive, Dropbox, or services more dedicated to media storage like Backblaze, allow you to store your large video files safely yet easily access them from every digital device. Just make sure that you opt for a certain service with ample capacity for storage and strong encryption to keep your data safe and secure.
- External Hard Drives: When shooting a lot of footage it’s cost-effective to buy an external hard drive with a big storage capacity that can meet the needs. You should primarily consider an SSD (Solid-State Drive) as it is a lot faster and more durable than an HDD (Hard Disk Drive) but can be rather expensive. Whatever device you choose, be sure to keep it in a cool and dry place, and maybe look into drives that have hardware encryption for added security
- Regular Checks: With time, storage devices fail, and cloud services may close down. Get into the habit of reviewing your backups from time to time; ensure every file is in place, and refresh your method of storage as needed. Update your backups regularly, particularly when you have made edits or added footage
Making Drone Footage Stand the Test of Time
Keeping your drone footage beautiful and healthy means using a mix of preventative proactive care and having the right tools available for troubleshooting when things do go wrong. From knowing common problems, such as file corruption and glitches, to knowing a good amount of both general and specific repair techniques, you have the knowledge you need to protect and restore your footage. Tools like Stellar Repair for Video can be your safety net when all else fails, ensuring even severely damaged files can be brought back to life.
So as you sky-trail with your drone, remember those preventive strategies, back up your footage regularly, and choose the right formats to conserve and distribute. And when things do go wrong? If you’ve got your recovery software on hand, then your aerial adventure can typically be salvaged back to its former glory— ready to share and enjoy. If you found this guide useful, consider sharing it with other drone enthusiasts, who too might benefit in maintaining their memories safe.