How To
What is Airdrop and how to use it on iPhone or Mac

- September 5, 2017
- Updated: July 2, 2025 at 6:47 AM

Gone are the days of struggling to share files, photos and images with others using portable USB devices and CDs. Some files, especially those containing images and videos, are too big to be sent via email, which means resorting to other sharing methods, none that are really easy or convenient.
With Airdrop, your Apple devices can easily share photos, files and more with other Apple devices nearby. Airdrop makes it very convenient to share relevant files, whether you’re at work or just relaxing at home.
What Does Airdrop Mean on iPhone, iPad and Mac?
Airdrop is an efficient and fast way of sharing data between devices. Apple developed it specifically to simplify sharing files, photos, videos, and other forms of data between Apple devices. With Airdrop, you can easily share photos or music from your Mac to your iPhone or iPad and vice versa.
Airdrop was explicitly developed for Apple products and allowed easy sharing between iOS and macOS. You cannot use Airdrop to share with Windows or Android devices.
How Does Airdrop Work and What Is it Used For?
Airdrop uses a combination of Wi-Fi and Bluetooth to send files between Apple devices on the same network. This feature can be used to quickly and almost effortlessly share files, music, photos, videos and more between Apple devices.
You can use Airdrop to share these devices among your own Apple devices, or you can even use it to share data with friends, family and co-workers. To use Airdrop, the devices you want to share have to be connected on the same network and have to be close to each other (within 30 feet).
How to Use Airdrop on Every Apple Device
Let’s take a look at how to use this useful feature in this quick Airdrop tutorial.
Airdrop Setup
To start using Airdrop, it has to be enabled on your device and the device you want to share files with.
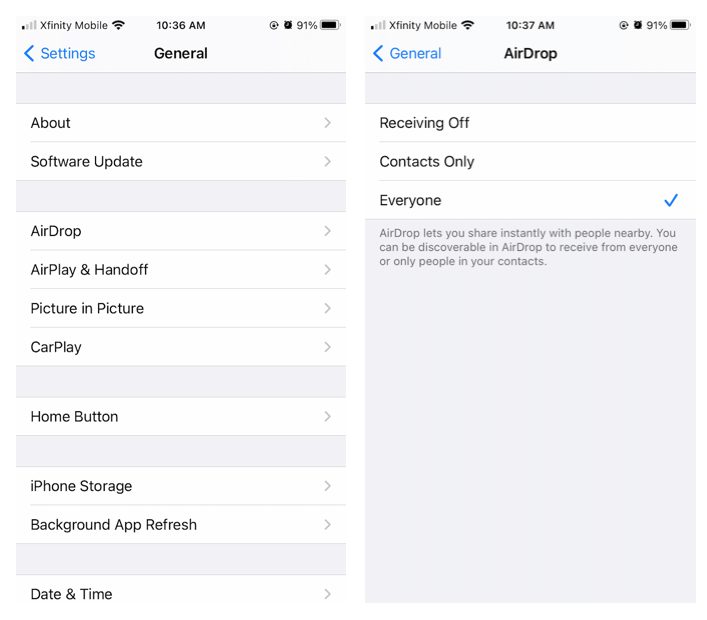
To check that Airdrop is active on your iPhone or iPad, tap on ‘Settings’, and then ‘General’ and finally ‘Airdrop’. If it is not enabled, make sure to activate it. Once you enable this feature, it will remain enabled until you disable it.
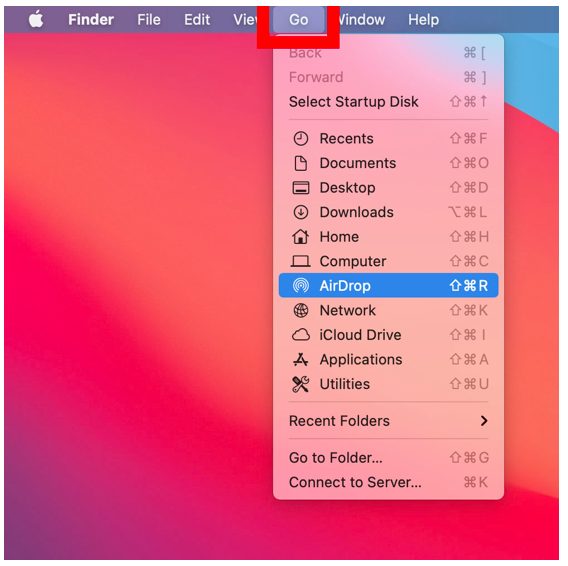
For Mac, click on ‘Finder’, then ‘Go’ and finally click on ‘Airdrop’. Enable Airdrop from this window.
Remember that any Apple devices that do not have Airdrop enabled will not be able to share or receive files.
Accept Airdrop
To accept an Airdrop on your iPhone or iPad, you will see a notification appear on your screen. This notification will also show a preview so that you can see what is being shared. You will have two options, accept or decline.
By tapping on ‘Accept’, the file will be downloaded to your device. The process will work the same on your Mac computer, and the file can be found in your download folder after it has been downloaded.
Sending an Airdrop
Sending an Airdrop is just as easy as receiving one. On your iPhone or iPad, go to the file, photo or video you wish to share (you’re able to select more than one file at a time). Now tap on the ‘Share’ button, the icon is a box with an arrow pointing out of it.
A new window will open showing all your different sharing options, and Airdrop should be the first one (if Airdrop is enabled). Tap on Airdrop, and you will again see a new window open. The Airdrop screen will show all nearby devices with Airdrop enabled. Simply tap on the device you want to share your files with.
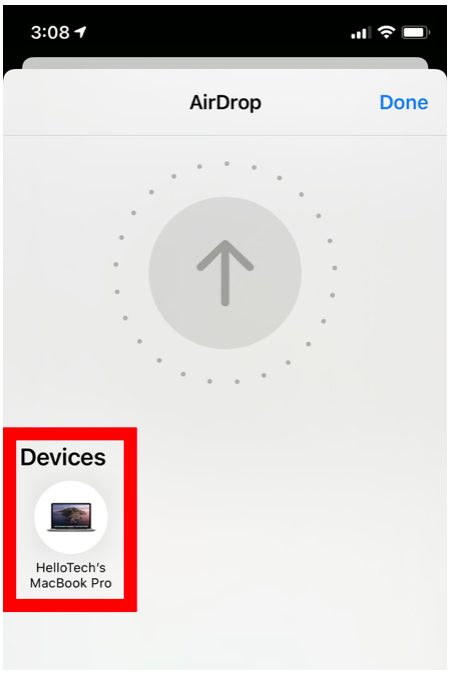
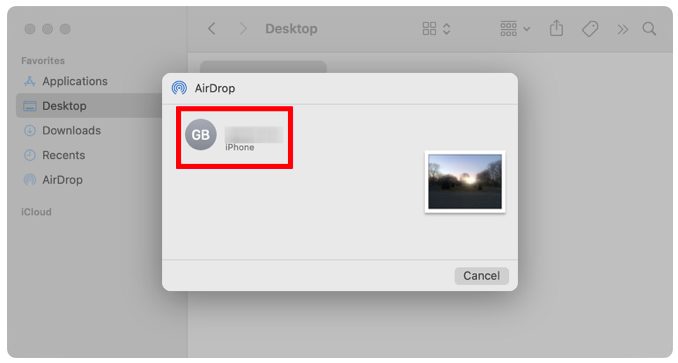
On your Mac, you can open the file you want to Airdrop and click on ‘Share’ in the app window. Now click on Airdrop to open the Airdrop window. Now you can choose which device you want to share the file with.
Alternatively, you can select multiple files, then right-click and from the drop-down list, click on ‘Share’, and then ‘Airdrop’. This will also open the Airdrop window where you can select the device you want to share to.
Receiving an Airdrop
As mentioned, when you receive an Airdrop, it will appear as a notification on your screen. From here, you can choose to accept or decline the Airdrop. There is also a preview feature available to see what the file is before accepting it. Once you click or tap on ‘Accept’, the file will be downloaded to your device.
How to Airdrop Pictures
To Airdrop pictures from your iPhone or iPad, you select the pictures you want to send and then tap on the ‘Share’ option. This will open a window with your sharing options. Now, tap on ‘Airdrop’ to open the Airdrop window. Here you will see all the available devices that are in range and have Airdrop enabled. Tap on the device you want to send the pictures to.
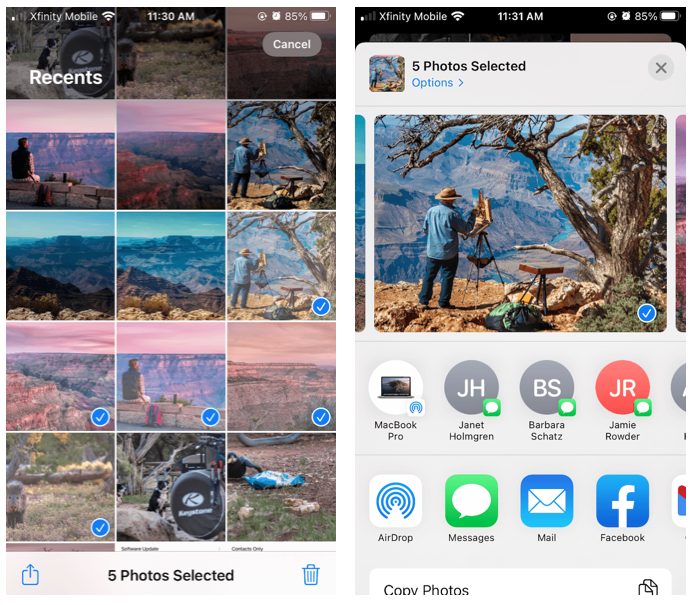
On your Mac, you can select all the pictures you want to share and then right-click. Now, you’ll see a drop-down menu, click on ‘Share’ and then ‘Airdrop’ to access the Airdrop window. Next, choose the device you want to send the pictures to.
How to Airdrop a File
Airdropping a file works the same way as sending pictures. On your device, select the file or files you wish to Airdrop, choose ‘Share’, and select ‘Airdrop’. Now you can choose the device that you want to share the files with.
Latest from Leri Koen
You may also like
 News
NewsProSpy and ToSpy: the latest spyware threats disguised as messaging applications
Read more
 News
NewsPersonalized ads are coming to Facebook and Instagram thanks to conversations with AI
Read more
 News
NewsThese are the new releases coming to Crunchyroll this fall
Read more
 News
NewsElon Musk asks followers to cancel their Netflix subscriptions
Read more
 News
NewsThe Russos share an image that could provide clues about the upcoming Avengers movie
Read more
 News
NewsThe queer dating reality show on Netflix has come to an end and will not have a third season
Read more