How To
How to: Add a snow effect to text in Photoshop
- December 12, 2008
- Updated: July 2, 2025 at 9:26 AM
I’ve always preferred to give handmade presents, a piece of handicraft made by myself that makes the gift more personal. Following this idea, and as the holiday season approaches, I like to prepare special Photoshop tutorials to create your own greeting cards. In case you missed them, here’s the 2007 tutorial and here’s the 2008 one. And for those behind the deadline, here’s another easy tutorial that shows you how to add a snow effect to text; a simple yet effective trick you can use for cards, themes and all sorts of Christmas-related graphic.

1. Open a new document and fill it with a dark color (blue, for example). Then use the Text tool to write your message on it.

2. Select the Lasso tool and begin drawing shapes on top of the letters. These shapes will become the snow later on, so take your time and draw them as carefully as possible. Also, make them look as if they were dripping from the top down.
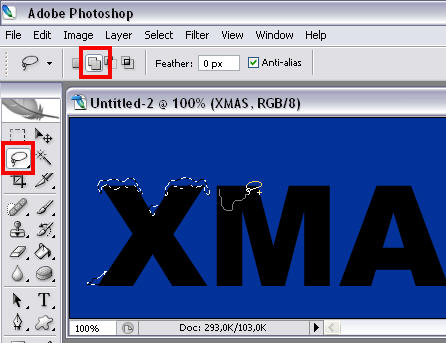
3. Now go to the Channels window and create a new channel by clicking on the button at the bottom bar. Fill that selection with white.
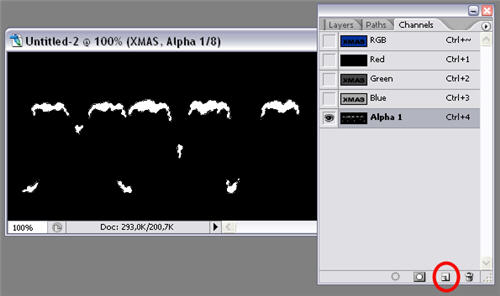
4. Go to Filter > Blur > Gaussian blur and apply a blur effect with a value of about 2 pixels. Then press Ctrl+L and adjust levels so that the snow shapes look sharp and smooth.

5. Now go back to the Layers window and create a new layer. Go to Select > Load selection and in the Channel field, choose “Alpha 1”, the channel you created before. Use the Bucket tool and paint those selections with white.

6. Add a Bevel and Emboss effect to this layer, to create some shadows in the snow and make it look more realistic.
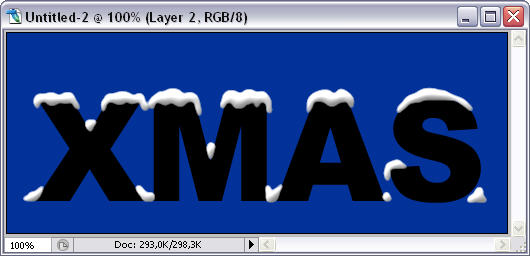
7. Now you’re free to add some effects to the text itself. Select the text layer and play with colors, bevel and emboss, inner shadow, stroke…
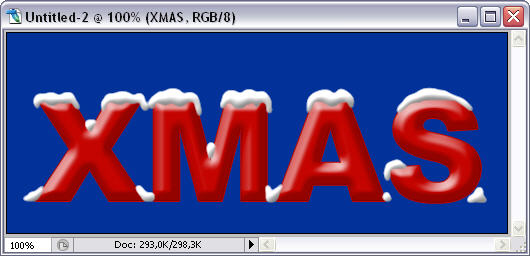
8. Create a new layer between the text and snow layers. Grab the Brush tool, lower its hardness (about 50%) and paint on the newly create layer with white, so that it looks like snow on the ground. Then apply to this layer the same effects you used for the snow layer.

9. Finally, add some finishing touches like a gradient overlay on the background, another layer with snowflakes, some dropping shadow… Your snowy text is done!

You may also like
 News
NewsThe infinite canvas: use of Generative Expand for print bleeds and concept exploration
Read more
 News
NewsJames Gunn clarifies the future of Harley Quinn after years of being a DC icon
Read more
 News
NewsSouth Korea has grown in streaming much more than expected. They have to thank themselves
Read more
 News
NewsOne of the most controversial (and brave) artists in history will have her own biopic
Read more
 News
NewsWe have been waiting 15 years for the end of one of the best mangas in history. And now, finally, it is going to arrive
Read more
 News
NewsThunderbolts is coming to Disney+ sooner than you thought: This will be the release date on the platform
Read more