How To
How to record internal sound on Mac OS X

- August 7, 2019
- Updated: July 2, 2025 at 4:36 AM


Recording internal sound on a Mac is problematic. Unlike Windows, you can’t simply record whatever noise is playing. If you’ve ever got stuck wondering how to capture streaming audio from a website or any other sound playing through your Mac, here’s how to do it:
How to record internal sound on a Mac
Using QuickTime Player
Although we will detail another method using Audacity and Soundflower, you can also use QuickTime Player to record audio.
To record audio, follow these steps:
- Go to the File menu
- Choose “New Audio Recording”
- Click the arrow next to the record button to choose the recording and microphone quality.
- Use the volume slider to monitor the audio while it’s recording.
- Click the red Record button to start recording. Click it again to stop.
Using Audacity and Soundflower
Step 1
Download and install Audacity, an audio recorder/editor, and Soundflower, which allows your internal sound to be captured.
Step 2
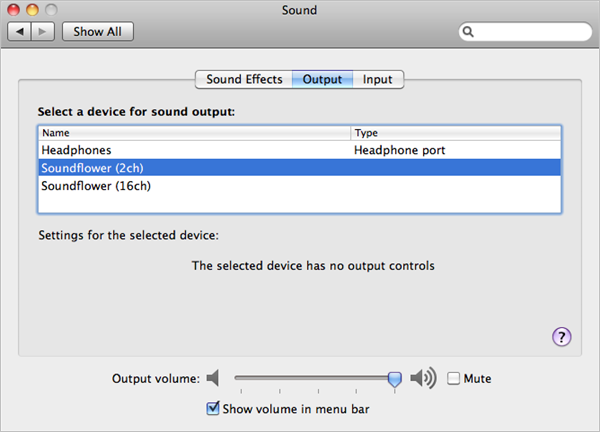
Open System Preferences > Sound > Output. Now that Soundflower is installed, you’ll be able to choose it instead of the built-in output. Soundflower (2ch) is fine for most purposes. Note that once you do this you will no longer be able to hear a sound. To make a clean recording, also turn off all sound effects here in the Sound preferences.

Step 3
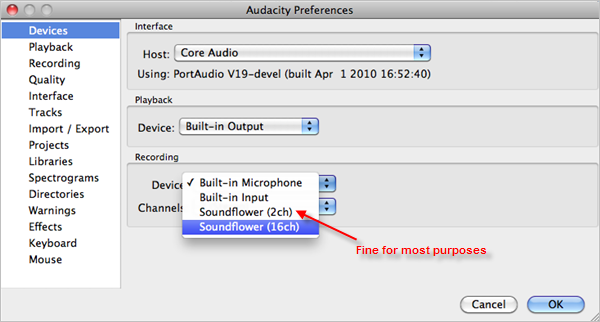
Open Audacity and in preferences, look under Devices and choose Soundflower (2ch) from the Recording Devices drop-down menu.

Step 4
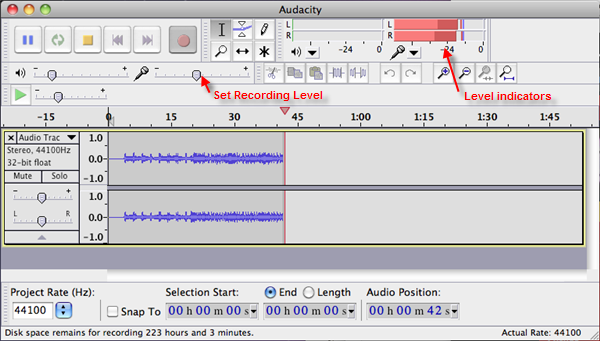
On the top right of the Audacity interface, there is a microphone symbol with a drop-down menu next to it. Click it, and hit ‘Turn on monitoring.’ You will now see red level indicators jumping whenever a sound is made. Play the sound or stream you want to capture and adjust the microphone level-slider on the left so the red bars reach close to zero when they peak.

Step 5
You’re now ready to capture. Stop your stream, and pause it at the start. Hit the red record button in Audacity, then play your sound stream. Be aware that if you haven’t turned off any sound alerts or effects, these will also be captured in your recording. Once finished, save the project from the File menu. At this point, you can turn on the internal audio again in System Preferences. Any editing of your recording should be done now (See this post for audio editing with Audacity).
Step 6
Again from the File menu, choose Export which allows you to convert your recording into a more useful format like MP3 or FLAC. You can now listen to your captured recording at your leisure.
You may also like
 News
NewsAfter two decades of waiting for it, this medieval game that fans kept asking for is back
Read more
 News
NewsWe do not lose faith in the adaptation of 'One-Punch Man'. The project is still going strong, although we will have to wait
Read more
 News
NewsKeke Palmer will star in the adaptation of this 1980s movie
Read more
 News
NewsIf you're a fan of Yellowstone, you can't miss this period series that just premiered on Netflix
Read more
 News
NewsThe surreal stories of Chuck Palahniuk will return to the big screen with this adaptation
Read more
 News
NewsThe director of 'Wuthering Heights' wants it to be the 'Titanic' of a new generation
Read more


