Article
Create admin users in Windows
- April 30, 2014
- Updated: July 2, 2025 at 7:43 AM

As part of our Windows Tip of the Week series, this week we’ll show you how to create admin accounts in Windows.
Windows admin accounts are user accounts that have permission to makes changes on your PC that effect all users. Often, admin permission is necessary to install and uninstall apps and to change the computer’s configuration settings. In this article, we’ll show you the traditional way of creating an admin account, as well as the “secret” way of doing it.
Before we show you how though, you need to remember that giving admin permissions to a user could pose a security risk, so be careful who you give them to, and make sure that you’ve always got the accounts under control. It’s also a good idea to make sure the admin user accounts are protected with a password.
The traditional method
The most popular (but also most limited) way of creating a new administrator account is via the Control Panel. To do this, go to Control Panel > Users Accounts and Family Safety > User Accounts > Manage another account.
If you want an even easier way to find it, just write “user accounts” in the Windows search menu.
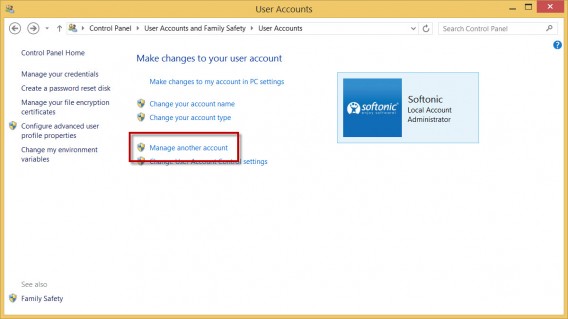
Now choose Add a new user in PC settings (Windows 8.1) or Create new account (Windows 7 and earlier). Write a name and select the type of account. In this case, it’ll be Administrator:
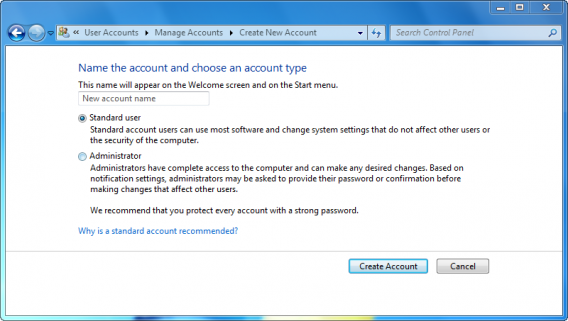 Account creation menu in Windows 7
This way of doing it has several limitations. You can’t, for example, create multiple accounts at once, and it doesn’t let you configure password security options. It also doesn’t let you add a description for the account.
The “secret” method
The advanced way of adding admin users is to do it via the Computer Management menu, a hidden option that lets you control many aspects of your PC.
1. Access the Users and Local Users menu
You can access this menu via Control Panel > System and Security > Administrative Tools > Computer Management.
In Windows 8.1, you can open this option quickly by pressing the Windows key + X and selecting Computer Management. On older version of Windows, just type “Computer Management” into the search menu.
When it opens, you’ll find the option inside System Tools.
2. Create a new user
Click on Users and Local Groups > Users and you’ll see a list of the computer’s current users.
To create a new user account, right-click inside the windows and select New User.
3. Configure the new user
In the window that appears, you’ll have to enter the following data:
- Name
- Full name
- Description
- Password: if you don’t want to use a password, leave this blank
- Password options: here, you can deactivate the account without deleting it, force the user to change the password when they begin the next session, prevent the password from being changed, or set it so that the password never expires
Once everything is ready, click Create.
4. Add the new user to the Admin Group
The final step is to add the new user to the Admin group. Windows allows you to create user groups so that you can manage multiple accounts at once. The Admin Group is created by default, and all users in the group have admin privileges.
To add a new user to the group, right click on the username and choose Properties.
Then open the Member Of tab and click Add.
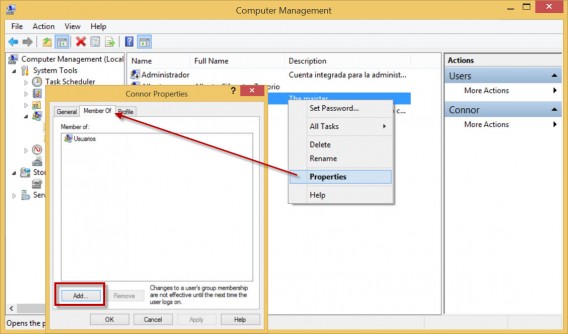
Now write “Administrators” in the field, and click Check Names. The system will recognize the group and put everything in the right format.
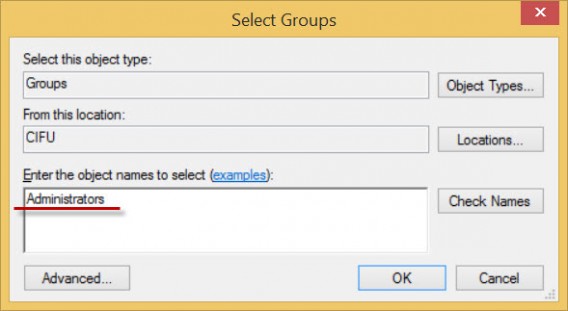
Finally, click on Accept, and you’ll have a new admin user.
If you want more information about Windows, check back every Wednesday for our Windows Tip of the Week.
You may also like
 News
NewsDeadpool will not end in Marvel after 'Secret Wars'. In fact, Ryan Reynolds is already preparing his new movie
Read more
 News
NewsAfter 'Stranger Things', its creators already have a release date for their next series on Netflix
Read more
 News
NewsSydney Sweeney has caused a stir on the Hollywood red carpet. The blame is on her bras
Read more
 News
NewsHBO has presented its new comedy with a hilarious trailer that promises a new hit
Read more
 News
NewsWith Stephen Colbert's departure, American television will change forever… And we already know what day it will be
Read more
 News
News'Avengers: Endgame' has fallen in China to an animated movie
Read more


