How To
How to add keyframes in Premiere Pro
- November 10, 2021
- Updated: July 2, 2025 at 4:01 AM
Adobe Premiere Pro is a comprehensive software for video editing and production. It’s an Adobe Creative Cloud app with a flexible, intuitive interface packed with excellent features. You can create new projects and access others you’re working on.
Learning how to use keyframes is vital for getting the best out of Premiere Pro and creating stunning professional-quality videos to send out into the world.
What are keyframes?
You use keyframes to alter the properties of a video or audio effect in stages, which gives the impression that they’re moving. You create more than one keyframe and set values at each one. Premiere Pro will then gradually change the values between one keyframe and another. This is called interpolation.
For instance, you could set up one keyframe with a volume of -20dB and another 10 seconds later with a volume of 0dB. Premiere Pro will interpolate this into a smooth 10-second increase in volume. There are two methods for working with keyframes: the Timeline and the Effect Controls window.
How to add keyframes in Premiere Pro
Method 1: Using the Timeline panel

To expand a video track to work on it, double click in the video header. Once expanded, you’ll see three buttons to help you use a keyframe: Go to Previous Keyframe, Add-Remove Keyframe, and Go to Next Keyframe. A white horizontal line will show along the length of your clip, allowing you to look at your keyframes in the Timeline panel. To change an attribute, Ctrl+click on the clip’s FX badge.
Method 2: Using the Effect Controls window
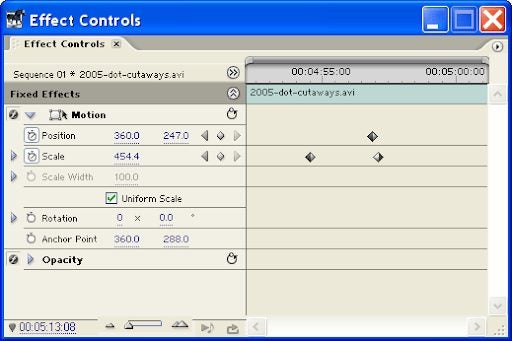
To use the Effect Controls window, select your clip in the Timeline and open it (Window > Effect Controls). You’ll be able to see your image and any effects you have added.
Using the Toggle Animation button will allow you to add keyframes. Navigating between the keyframes with the arrow buttons creates an animated effect.The right side of the window shows a mini timeline for the clip you’re working on. It shows keyframes as diamond-shaped icons. This view lets you see keyframes for all your effects simultaneously and gives you god control of the process.
When to use Keyframes
There are many ways to use keyframes in Premiere Pro. Here are a few:
- Create dynamic graphics, including for your main titles.
- Simulate camera effects such as panning and zooming.
- Bring still images to life using Position and Scale keyframes.
- Improve your audio using volume attributes.
Perfect your video
Adobe Premiere Pro is the ultimate package to use if you’re creating and editing videos. Using keyframes to animate parts of your video will play a significant role in creating the stunning effects you’re after.

Latest from Shaun M Jooste
You may also like
- News
This is the perfect game for all fans of Zelda: Breath of the Wild who feel orphaned from this type of adventure
Read more
 News
NewsThe new Dead by Daylight patch does not introduce a new killer, but it has an amazing music video and something even more important
Read more
 News
NewsThe hidden army of North Korea: 100,000 IT workers in Western companies
Read more
 News
NewsIf you're subscribed to PlayStation Plus, you have to play this game, the best of the service in years?
Read more
 News
NewsEdenstone, a studio from Singapore, will premiere the first series created in collaboration between humans and AI
Read more
 News
NewsGru: My Favorite Villain will receive a spin-off set in the 1920s
Read more