How To
Recording With VLC Media Player in 9 Easy Steps

- May 18, 2021
- Updated: July 2, 2025 at 4:06 AM
VLC Media Player is a great program to play movies, videos, and music on Windows and Mac devices. But, did you know that you can also use this media player to make recordings?
This function is not one of the best-known features because it’s not available on the home screen as it’s an advanced setting and a very useful feature if you want to record from a DVD or stream, or even record your desktop.
Open VLC
Launch VLC by clicking the app icon.
Go to ‘Media’ and Then ‘Convert/Save’
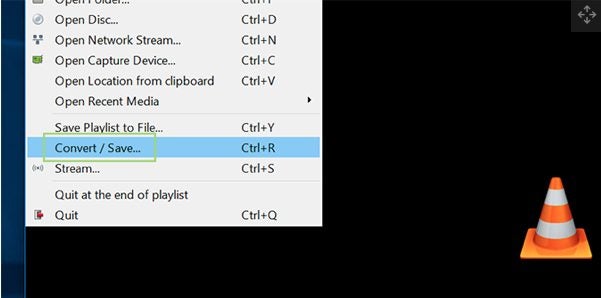
Navigate to the ‘Media’ tab in the top right corner of the media player. In the drop-down list, click ‘Convert/Save.’
Click on the ‘Capture Device’ Tab
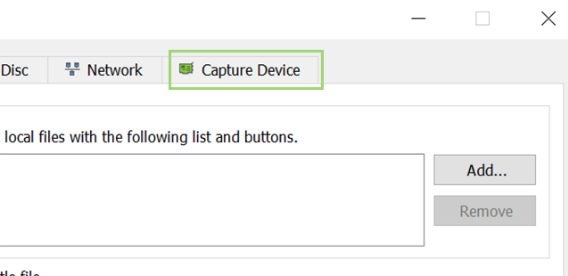
In the new window, choose the tab on your right titled ‘Capture Device.’
Set Capture Mode

The first line lets you set the capture mode. By clicking this option, a drop-down list will appear with the available options. DirectShow taps into your webcam and allows you to record with the webcam. The TV-Digital option lets you record from a TV tuner card. Finally, the Desktop option enables you to record what’s happening on your desktop screen, such as streaming videos and DVDs.
Set Your Frame Rate
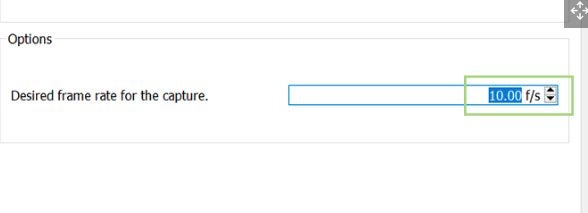
Set your desired frame rate; we recommend using about 10f/s (frames per second), as this will be enough for most recordings.
Click ‘Convert/Save’
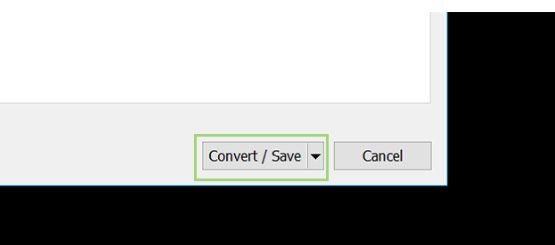
Click ‘Convert/Save’ at the bottom of the screen.
Choose the File Name and Destination for Your Saved Recording
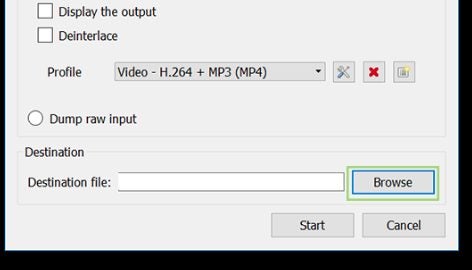
Next, type in the file name and destination folder you would like to save the recording to once completed.
Click on ‘Start’
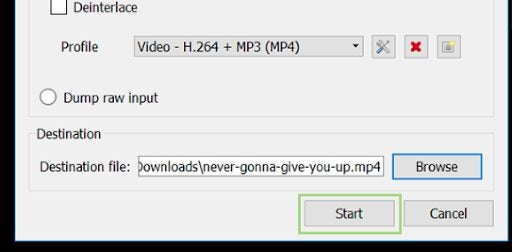
Click on ‘Start’ to start with your recording.
Click on ‘Stop’ When Finished

Click ‘Stop’ once you have finished your recording.
Watch, Listen, and Record
Not only can you watch videos and listen to music with VLC media player, but you can also make recordings. Why not try taking a recording now?

Latest from Shaun M Jooste
You may also like
 News
NewsThe end of the season of the best superhero series returns to deliver its great surprises
Read more
 News
NewsInteractive 3D Mockups: De Illustrator a AR
Read more
 News
NewsThe best game of The Lord of the Rings receives an expansion that adds 20 more hours of gameplay
Read more
 News
NewsNo Man's Sky receives an update that prepares you for Halloween
Read more
 News
NewsJeremy Strong is convinced that his Zuckerberg will be completely different from Jesse Eisenberg's
Read more
 News
NewsSeason 1 of Battlefield 6 is almost here and these are some of its new features
Read more