Article
Start your own live internet radio station for free
- March 15, 2010
- Updated: March 7, 2024 at 9:33 PM
I’m a wannabe radio star and I’ve already got a few podcasts under my belt. But for a long time I’ve been looking for a way to broadcast a live show over the internet. I lost patience trying to learn how to use Shoutcast and found uBroadcast to be too unstable. Last week I discovered Spreaker, an online application that lets you broadcast live radio for free. Within 10 minutes of signing up to the service I was on air, pumping out my favorite tunes and talking to the listeners. By sharing I managed to get about 50 live listeners too, who were impressed by the quality of the broadcast (if not, my presentation skills).
So, here’s a quick guide to how to start your own internet radio station using Spreaker:
1. Visit Spreaker.com and click on the Go on air now link then complete the sign-up process. You’ll receive an account verification email, with a link which you need to click to activate the account.

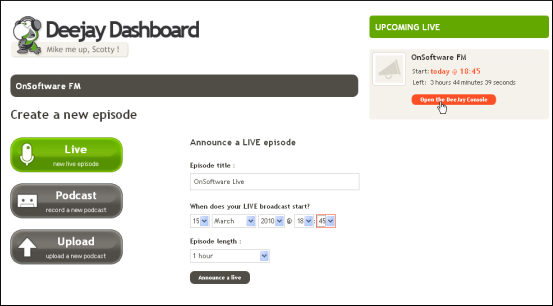
2. This is the page where all your past and current shows will be displayed. Click Create a new show to do just that.

3. Now you should enter the details of your radio show. Give it a title and enter a description for the show. Then select the language you’re broadcasting in and choose a category from the drop-down menus.

4. In the Create a new episode menu, click on the Live option. Note, there are also options for creating a podcast or uploading an existing podcast to be broadcast. Give the episode a title and select the date and time you want to go on air, then enter the duration of the show. Now click Open the Dee Jay Console to start the fun.
5. Spreaker comes with its own library of songs, loops, jingles and soundtracks, based on what the community has uploaded. You can browse the library using the Explore, Search and Latest tabs. Click Play to preview the audio and then hit Add to add the ones you like to your playlist.
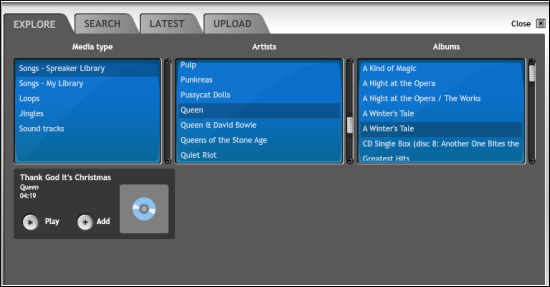
6. You can also use your own songs and other audio, via the Upload tab. Again, make sure you hit the Add button to insert the tracks into your playlist.

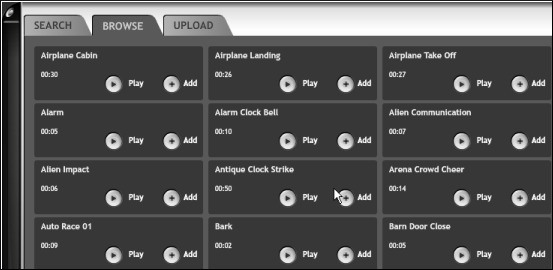
7. Hit Close when you’ve added all your audio. You can go back to add more tracks and jingles during the broadcast if you need to. Spreaker also features a range of fun sound effects that you can play at any time during your broadcast. Add these to the Sound FX playlist using the Add button next to this window, which appears in the bottom-right of the interface.
8. Now you’re ready to start broadcasting. The main DJ console consists of three faders – one for the mic, and two for audio files, which you can drag in from the Playlist. You can use the Monitor buttons to isolate the audio on a particular track. Don’t forget about the sound effects, which can be played with a single click on the name. As soon as your time slot rolls around, the On Air button will light up and you’re off! Remember to share your broadcast with your Facebook friends using the option at the bottom of the screen. Your show will also be publically available from the Spreaker.com home page.


You may also like

Number Of Dc Fast Charging Ports Reaches 55,580 Amidslower Growth
Read more

It seemed like an impossible enemy, but it was actually the smartest anti-piracy system we’ve ever seen in a video game
Read more

Rising Tariffs and Political Fallout: Tesla Faces Unique Challenges in the EV Market
Read more

How to translate text directly from your phone’s keyboard
Read more

Meet the Buick ELECTRA GS: A Bold Step into the Electric Future
Read more

New Volkswagen ID.UNYX 06 Features Enhanced Tech and Impressive Range
Read more