How To
How can I easily get images to align perfectly top to bottom in Microsoft Word?

- March 22, 2022
- Updated: July 2, 2025 at 3:52 AM
Microsoft Word has excellent image management tools and they have become easier to use with the release of each successive version. Once you’ve learnt how to use them you’ll have no problem placing your images exactly where you want them and how you want to align them with other images, objects or text.
For starters, the Position tab in the Layout dialog box allows you to place and align images perfectly. Using it and other methods, you can align your images horizontally along their top or bottom edges, or vertically (from top to bottom) through their centers. You can also use the Snap To guides to align them. Here’s how to do it.
Align images perfectly in Microsoft Word
Group images and align them
You can align your images vertically by grouping them first.
Select formatting
To align an image in Microsoft Word, first select Picture Format or Picture Tools > Format.
Then choose the images you want to align. To select images that are stacked or hidden behind text, go to Home > Find and Select > Select Objects, and draw a box over them.
Select images
Choose two or three images that you want to align. Bear in mind that they must fit on the page next to each other if you want to align them vertically, in other words get their top and bottom edges to line up perfectly. Select the first image, then hold CNTRL and choose the others you want to align it with.
Align
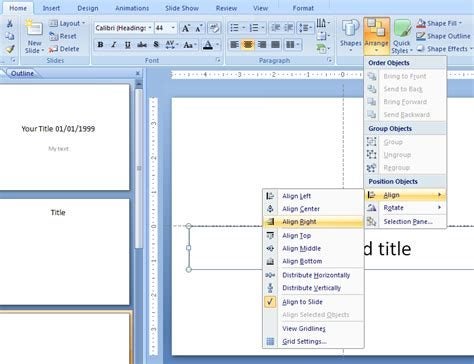
In the Arrange group, click Align, and then select the following command from the menu.
Align Center: Aligns your images vertically through their centers.
The other options you can use are Align left, Align right, Align top, or Align bottom, to align images along their left, right, top or bottom edges. You can also choose Align middle to align them horizontally through their middels. This is the same as Align Centre, except it aligns them in the opposite direction.
Use the Snap to command
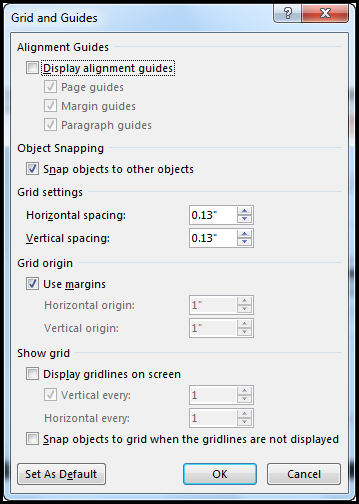
Make pictures, (or charts and other objects) align perfectly on a Microsoft Word page by using the snap to option You can only do this if you’re working in Print layout.
Select the images (or other objects) in your Word document that you want to align.
In the Grid and Guides dialog box, you’ll see various choices. Select Snap objects to other objects. This will make the images line up perfectly.
Put images into a table or text box
Another way to align images vertically, or any other way, in Microsoft Word, is to put them into a table. Create one with one row and two columns. Put one image in one column and another in the other column. You can set the gridlines around the table to invisible, then all you will see are the pictures fitting perfectly along the top and the bottom of the unseen outline.
You can also do this using a text box. You create one, put your image in it and then move it around the page and put it where you want it or align it with another picture in a text box. You can remove the text box borders by using the Text box format option.
Image alignment made easy
There are so many options for aligning your images in Microsoft Word that there’s no need to stress about it anymore. You can define their spacing, height, and width and align them perfectly using the method you prefer once you’ve tried out a few!

You may also like
 News
NewsGmail Help Me Write with Gemini: 7 Ready-to-Use Prompts for Complaints, Sales & Internal Memos
Read more
 News
NewsZootopia 2 is the highest-grossing movie of 2025
Read more
 News
NewsAvatar: Fire and Ash is so expensive that it could very well dominate the box office and be an absolute failure
Read more
 News
NewsHow to use the new AI integrated into the Photoshop device for safe and fast offline editing
Read more
 News
NewsThe creator of Tetris is a Russian who also worked on a Microsoft game that you might have played
Read more
 News
NewsThe first game entirely made with AI is created and it doesn't look good
Read more